


These super easy, 4-ingredient (5 if you add honey!) apricot balls are the perfect quick breakfast or snack on the go. They have a tangy and slightly sweet flavor that adults and kids will both love. And, you can make them ahead of time and keep them in the fridge or freezer!

Note: this post was originally published in 2019 and updated in 2022 and 2023 with new photos and improved instructions.
I've been super busy lately, running around in a million different directions. So for me, that means grabbing whatever snack is on hand...chips, my daughters' goldfish crackers, etc. Not the healthiest options for sure! And I want to try and find a way for my daughters to branch out from goldfish crackers for snack time too. Enter these amazing apricot balls (aka apricot bliss balls)!
I tried out one with oatmeal as an ingredient, and that did not go over well with my toddler. ("Mommy, there's a bad piece in here.") So, I came up with this grain-free apricot balls recipe that is just dried fruit, nuts, and a bit of orange juice and zest for flavor.
And, I think the flavor combo of these apricot balls appeals to adults too - the apricot is slightly tangy, the dates add sweetness, and the orange zest adds an aromatic freshness.
This post contains affiliate links. As an Amazon Associate I earn from qualifying purchases. If you make a purchase through the link, it won't cost you more but I may earn a small commission. I only recommend products that I personally use and love!
Jump to:
Recipe ingredients

Ingredient notes
- Cashews: I prefer using roasted, salted cashews. I think they have more flavor, and the bit of extra salt provides flavor for the bliss balls. But, feel free to use whatever kind of cashews you like.
- Dried apricots: you will need sulfured apricots; these are the most common type available at stores (at least here in the US). Sulfured apricots work better in this recipe because they are much softer and more moist than unsulfured apricots. Check out this article for more info on sulfured vs. unsulfured apricots.
- Medjool dates: for easiest prep, buy Medjool dates that are already pitted. But, if you can't find those, you can cut the dates in half and take the pits out yourself.
Step by step photos
Here's how to make these deliciously tangy and sweet apricot balls step by step. To view a brief slideshow of these steps, check out my apricot balls web story!
1. First, pulse the cashews in the food processor until they are finely chopped. This took me about 9 - 10 one-second pulses.
In terms of food processors, I recommend this Cuisinart 14-Cup food processor (affiliate link) - it's super powerful and the perfect size for most recipes! (It's the same one I use for my dill pickle hummus, easy bean dip, and strawberry mimosas recipes.)


2. Next, remove the cashews from the food processor into a bowl. At the same time, be sure to measure out 6 tablespoons (40 g) of the cashews and place them in a separate, smaller bowl. The smaller amount of cashews will be used for the outside coating.


3. Now, add the apricots and dates into the now-empty food processor. Pulse the dried fruit until the fruit is chopped into rough pieces. This took me about 5 one-second pulses.

4. At this point, leave the fruit in the food processor for a moment while you turn your attention to the orange. First, zest the orange. I love using my Microplane (affiliate link) for this.
When zesting, be careful to only remove the colored portion from the peel. The white pith underneath can get bitter so you don't want that in your apricot balls!
Now, after zesting the orange, measure out 1 teaspoon of the zest.

5. Next, cut the orange in half and squeeze out the juice. You can use a juicer if you like, but you'll only need 1 - 2 tablespoons so I just squeezed the orange by hand.


6. Now you can add the zest into the food processor with the dried fruit. Also, add one tablespoon of the orange juice. And, if you're using honey, add that in now.


7. Pulse the food processor a few times to combine the zest, juice, and dried fruit (and honey, if using). This will further break up the dried fruit, and the mixture should start to clump up a little bit.

8. Next, add the chopped cashews back into the food processor. But, be sure that you keep the separate 6 tablespoons (40 g) set aside for the end!

9. Now, pulse the apricot ball mixture again a few more times, until the mixture begins to, well, ball up, like this!


10. Now, you can examine some of apricot ball mixture and see if it's a texture and taste that you like.
At this point, if you want the apricot balls to be softer, you can add in more orange juice. Or, if you want the mixture to be sweeter, you can drizzle in a bit more honey. (Just keep in mind that the mixture will firm up a bit when stored in the fridge!)

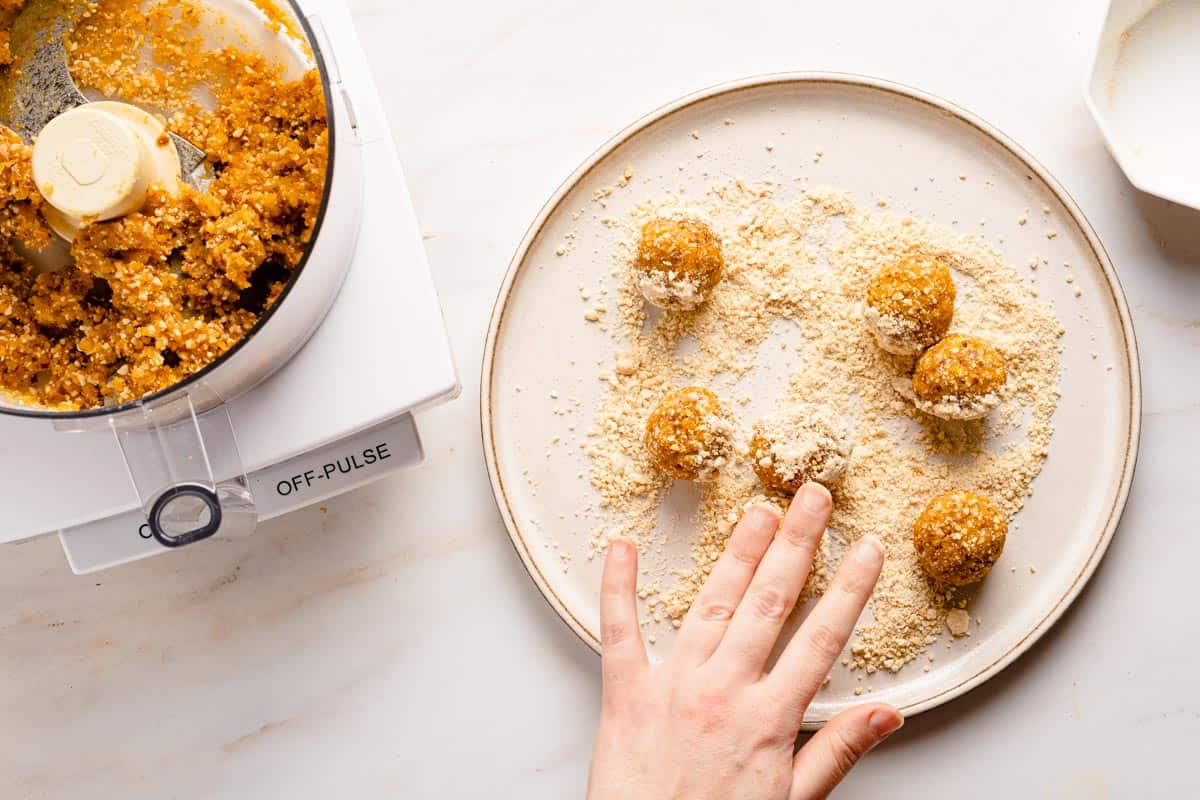
11. Next, pour out the reserved finely chopped cashews onto a plate.

12. At this stage, you can form the apricot bliss ball mixture into balls with your hands. You can make them any size you like. I made mine about 1 ½ inches (3.8 cm) in diameter.

13. Now, go ahead and roll each apricot ball into the finely chopped nuts to completely coat the exterior. Once the balls are fully coated in the nuts, you can enjoy them right away, or store them, tightly covered, in the fridge or freezer!
Tips and tricks
- The Medjool dates I used were about 2 inches (5 cm) long. If yours are smaller, you can use an additional 1 - 2 dates. Or, just go by the weight measurement I included in the recipe card below (130 g).
- If you're using unsalted cashews, you can add a pinch of salt to the mixture to help bring out the flavor of the apricot balls.
- Also, feel free to buy cashew pieces rather than whole cashews; they are less expensive and it doesn't matter anyways since they will be ground up!
- But, if you are using cashews that are mostly pieces, it would be most accurate to use the weight measurement rather than the volume measurement.
Storage instructions
- Because these apricot balls have freshly-squeezed orange juice in them, I prefer to store them in the fridge or freezer to keep them fresh.
- When storing, cover them tightly so they don't dry out or pick up odors. They will keep well in the fridge for about 3 - 4 days.
- You can also freeze the apricot balls. For best results, first freeze them flat on a plate or tray (covered with plastic wrap). When they are frozen through, you can move them to a zip top bag for long-term storage. Freezing them flat first prevents them from mashing together and distorting their round shape.
- Alternatively, you can layer them in an airtight food storage container, separating each layer with a sheet of parchment paper.
- Finally, these apricot balls, if properly sealed, should last well in the freezer for 3 - 4 months. You can then thaw them in the fridge for a couple hours, or let them sit at room temp for about 10 - 15 minutes.
Substitutions and additions
- First of all, if you don't have or don't like cashews, you can feel free to substitute your favorite type of nut. I think almond or macadamia nuts would be good substitutions.
- Cashew nuts are pretty soft, so just be aware that depending on the type of nut you substitute, you may need to pulse the nuts for longer than listed in the recipe to break them down to the right size.
- If you don't like orange juice, you can add a different type of juice, like apple. Or, you can even just add in an equal amount of water instead.
- Instead of (or in addition to) the orange zest, you could try lemon zest in the recipe. Or, just leave it out, and the apricot balls will still taste great!
- The honey is optional if you want a sweeter apricot ball. To make the balls vegan, swap in agave syrup for the honey.
- Finally, for a slightly different flavor and look, try rolling the balls in shredded coconut, or even colorful sprinkles for extra fun!
Recipe FAQs
If you're having problems with the apricot ball mixture sticking to your hands when rolling, try dipping your hands in water before rolling.
If you're still having problems, place the mixture in the fridge for 5 - 10 minutes and then try rolling the balls again.
I'm sorry, for this apricot balls recipe you really do need the food processor. The food processor is the best tool for efficiently grinding relatively dry, firm ingredients like dried fruits (when you aren't adding much additional liquid to the recipe).
Yes, you can for sure freeze these apricot bliss balls! They freeze well and will keep for about 3 - 4 months. See the Storage instructions section above for tips on how to freeze the balls.

Related recipes


If you've tried this recipe, please leave a star rating and/or review in the comments section below, I would love to hear from you! You can also follow me on Facebook, Instagram and Pinterest. And sign up for my weekly newsletter to get recipes delivered straight to you!
Print📖 Recipe
Apricot Balls

These soft, tender balls have a deliciously tangy and slightly sweet apricot orange flavor. Takes only a few ingredients and a few minutes to make!
- Prep Time: 10 minutes
- Total Time: 10 minutes
- Yield: 15 balls 1x
- Category: Breakfast, snacks
- Method: food processor
- Cuisine: American
- Diet: Vegetarian
Ingredients
- 1 cup (167 g) dried apricots, see note 1
- 6 pitted Medjool dates (130 g), see note 2
- 1 medium orange
- 1 ¼ cup (149 g) roasted salted cashews, see notes 3 - 4
- 1 - 2 tablespoons honey (optional if you want a sweeter ball)
Instructions
- Place cashews in the bowl of a food processor and pulse in 1 second increments until the cashews are finely chopped. This should take about 9 - 10 pulses. Remove the cashews from the food processor and set aside. Separate out 6 tablespoons (40 g) of the cashews to save for coating the balls at the end.
- Place the dates and apricots in the food processor and pulse in 1 second increments until the fruit is broken down into chunks (does not have to be perfectly even at this point). This should take about 5 pulses.
- Zest the orange and measure out 1 teaspoon of zest. Cut the orange in half and squeeze out 1 tablespoon of juice into a small bowl.
- Add the 1 teaspoon zest and 1 tablespoon juice to the fruit in the food processor. For sweeter balls, add in 1 - 2 tablespoons honey (optional). Pulse the fruit, zest and juice mixture a couple more times until the fruit is broken down into smaller, even pieces and the mixture begins to clump up.
- Add in the finely chopped cashews, except for the reserved 6 tablespoons (40 g). Pulse a few more times until the cashews are evenly incorporated and the mixture starts to form a ball.
- Taste a bit of the mixture. If you want it sweeter, add in a little (more) honey. If you want the texture to be softer, add in a little bit more orange juice. (Keep in mind that the balls will firm up a little more in the fridge.)
- Dump the reserved cashews onto a plate. Roll the fruit and nut mixture into balls. You can make the balls any size; I made mine about 1 ½ inches (3.8 cm) in diameter. Place the balls onto the plate and roll them around in the cashews until they are evenly coated. Store in the refrigerator or freezer, tightly covered. Balls will firm up as they chill. (See note 6 for storage times.)
Notes
- You will need sulfured apricots; these are the bright orange-colored dried apricots that are most commonly available (at least in the US). Sulfured apricots work best in this recipe because they are much softer and more moist than unsulfured apricots.
- The dates I used were about 2 inches long; if you have smaller dates you can add an additional 1 - 2 dates. Or, go by the weighted measure listed in the ingredients section (130 g).
- If your cashews are unsalted you may want to add in a pinch of salt to help enhance the flavors.
- Feel free to buy cashew pieces rather than whole; they are less expensive and it won't matter since they will be ground up. If using mostly pieces, try to use the weight measurement (149 g) instead of volume measurement for better accuracy.
- If the mixture is sticking to your hands too much when rolling, try wetting your hands first, and/or place the mixture in the fridge for 5 - 10 minutes before rolling.
- The balls will last in the fridge for 3 - 4 days, or for 3 - 4 months in the freezer.
- The nutrition information below was calculated to include 1 tablespoon honey. This nutrition information is an estimate provided by an online nutrition calculator, and should not be considered a substitute for professional medical, health, or nutritional advice. See our full disclosure policy.
Nutrition
- Serving Size: ⅕ recipe (about 3 balls)
- Calories: 361
- Sugar: 45 g
- Sodium: 43 mg
- Fat: 12.5 g
- Saturated Fat: 2.3 g
- Carbohydrates: 60.8 g
- Fiber: 5.6 g
- Protein: 5.7 g
- Cholesterol: 0 mg


Kathy says
Healthy and delicious and so easy
Cathy says
Looks delicious! A must for hiking trips!
Kate says
Yes these would be perfect for hiking!
Kate says
Thank you! I'm glad you like the recipe 🙂
Regan says
Thanks I am a mother and very busy! This helped me alot!
K says
Followed directions exactly and these little citrus balls of joy turned out perfectly. Thanks for sharing this recipe.
Kate says
K that is wonderful thank you for sharing! I'm so happy that the apricot balls recipe turned out well for you 🙂