


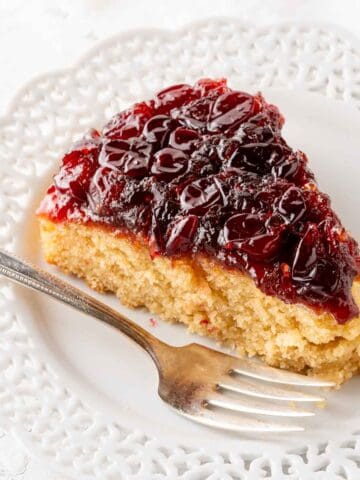
You can make this easy cannoli cake recipe with only 6 basic ingredients. And, since it uses store-bought pound cake, there is no baking involved! A simple and truly crowd-pleasing dessert for any dinner party or potluck.

Note: this post was originally published in 2019 and updated in 2021 and 2023 with new photos and improved instructions.
In my opinion, cannoli have got to be one of the most delicious desserts around. But, making cannoli from scratch is a ton of work. With this easy cannoli cake recipe, you can enjoy all the delicious flavor of your favorite chocolate chip cannoli, but with a fraction of the work!
I'm going to explain why I love this cake recipe so much, but first, let's get some background on cannoli and cannoli cake.
This post contains affiliate links. As an Amazon Associate I earn from qualifying purchases. If you make a purchase through the link, it won't cost you more but I may earn a small commission. I only recommend products that I personally use and love!
Jump to:
What are cannoli?
Cannoli are Italian pastries consisting of a fried or baked crispy tube-shaped shell that is filled with a sweet and creamy ricotta-based filling.
The filling can be flavored in various ways. Common flavors include chocolate, nuts, or candied fruit. The ricotta filling is often mixed with powdered sugar and vanilla extract, giving it a smooth texture and a slightly sweet taste.
What is cannoli cake?
So, like cannoli, cannoli cake combines the flavors of the classic Italian cannoli into a cake! This cannoli dessert is typically made with layers of vanilla or chocolate cake that are filled with a creamy ricotta-based filling, similar to the filling used in traditional cannoli.
Why you'll love this easy cannoli cake
This cannoli cake recipe brings all the best flavors from your favorite cannoli recipe, into a deliciously tender and moist cake! Here's why you'll love this easy cannoli dessert:
- There is absolutely no baking involved since it uses store-bought pound cake.
- You only need six basic ingredients!
- The cake is assembled inside an 8 x 8 (or 9 x 9) inch pan, so it's nearly foolproof to assemble.
- Because the cake is assembled in a pan (rather than in freestanding layers), it travels really well - a great option for dinner parties and potlucks!
Recipe ingredients

Ingredient notes
- Pound cake: you will need a 16 ounce (454 g) store-bought frozen pound cake. The specific pound cake I use is Sara Lee Family Size All Butter Pound Cake. I talk more about substituting other types of pound cake in the Recipe FAQs section below!
- Ricotta: I prefer using whole milk ricotta for the added richness it provides to the cannoli cake filling, but you could substitute part-skim if you like.
- Mini chocolate chips: usually I would say that you could substitute regular size chocolate chips. But, the mini size is better for the cannoli filling so you aren't crunching down on large bites of chocolate (if you don't mind that then you can use regular chips!).
Step by step photos
Here is a breakdown of how to make the easy cannoli cake. To see a brief slideshow how-to, check out my web story for this recipe!
1. Before you start anything else, make sure you place your pound cake in the freezer if it's not already in there! This will make it much easier to slice the cake when it's time.
After you take care of that, then you will start to work on the ganache. In a microwave-safe bowl, heat half of the heavy whipping cream on high for 90 seconds. Then, add in 1 cup of the mini chocolate chips.

2. Make sure all the chips are submerged in the cream, and let the mini chocolate chips sit in the hot cream for about 2 minutes. Then, stir the chocolate chips and cream together. It may seem like the chips won't melt at first, but it will come together!
If you need to, you can microwave the mixture for 15 seconds at a time, stirring in between, until everything is melted. Place the ganache in the fridge to cool down.

3. Now, start to work on the cannoli cake filling. Add the ricotta cheese, vanilla, and powdered sugar to a large bowl. Whisk everything together until smooth. Then, mix in ½ cup of the mini chocolate chips.

4. In a separate small container, whip the remaining heavy cream to stiff peaks. I like doing this with a stick (immersion) blender because it's super quick and easy.
If you want to use this method, just place the heavy whipping cream in a tall-sided container, like this quart sized glass jar. Work the immersion blender up and down in the heavy cream until you reach stiff peaks, which should only take about a minute.
If you don't have an immersion blender, you can place the heavy whipping cream in a small bowl and use hand beaters to whip.

5. Next, gently fold in about half the whipped cream to the ricotta mixture. Fold in the remaining whipped cream, again, doing so very gently to not deflate the air from the whipped cream. If you want more help on how to fold, check out this handy how-to guide on how to fold ingredients.

6. At this point you can retrieve the pound cake from the freezer. Slice it into ¼ inch (6.35 mm) thick slices. If you are using the 16 ounce (454 g) Sara Lee pound cake I recommend, you should have about ¼ of the pound cake left over.
You will need 24 total slices. But, this may vary if you are using a different size or brand of pound cake.

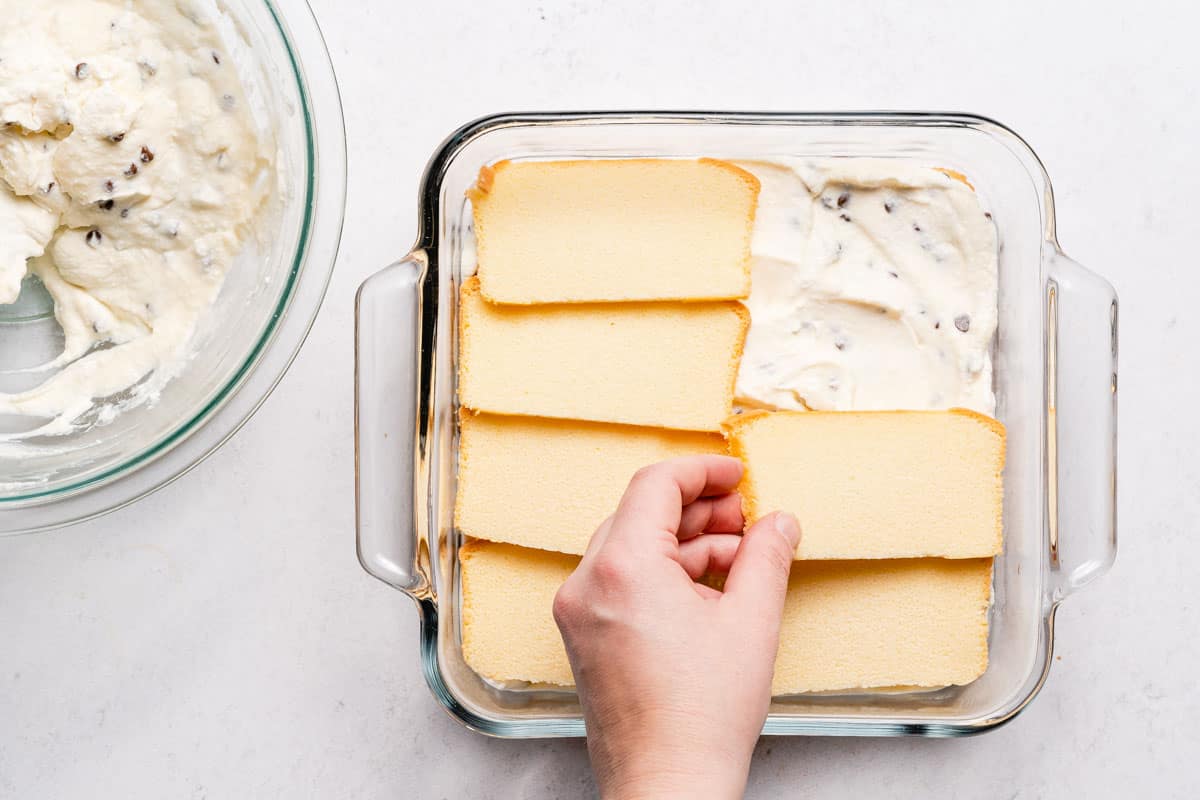
7. Place slices of pound cake into a 8 x 8 inch (20 x 20 cm) pan. Just make an even layer, and if the slices overlap slightly that's ok. If you need to, you can very gently press the slices into place so there are no gaps or air pockets.

8. Next, add half of the cannoli cake filling on top and spread it out into an even layer.

9. Top with another layer of cake.
10. Then, add the rest of the cannoli filling, followed by the final layer of pound cake.
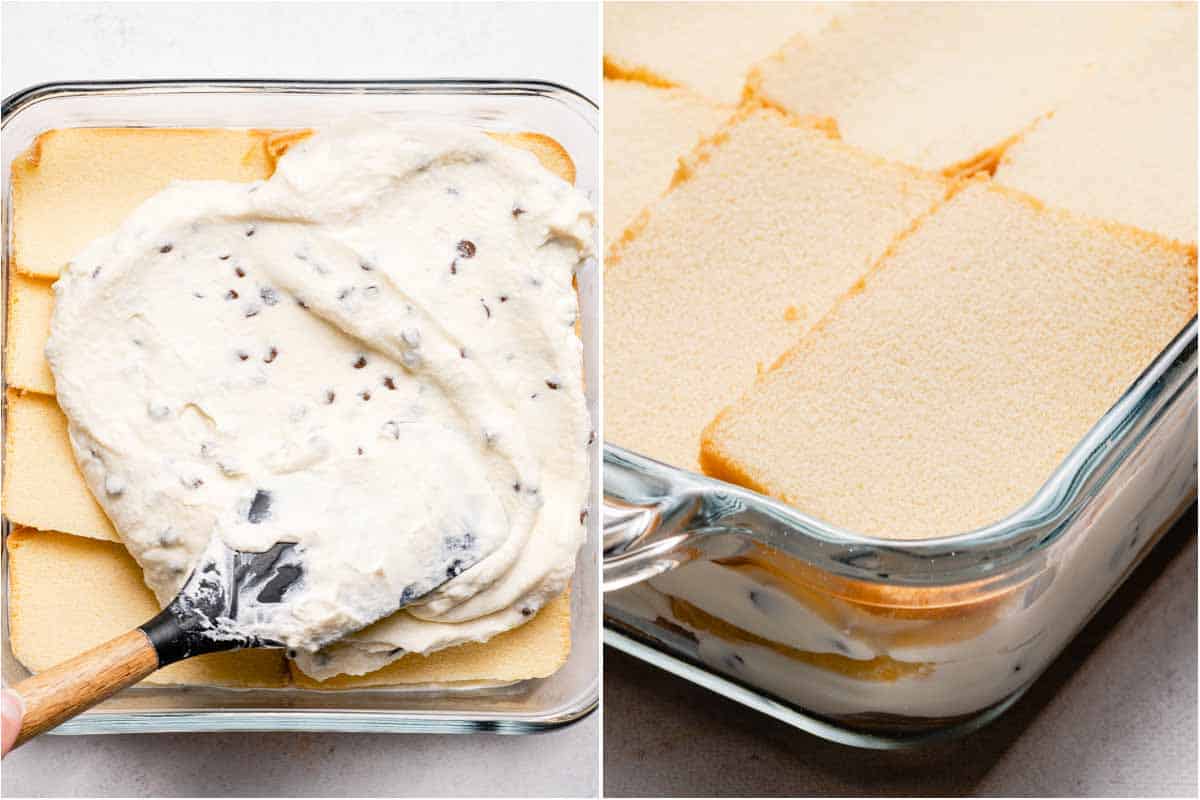
11. Press the cake down very gently, you should see any air pockets on the sides and corners closing up!

12. Grab the ganache from the fridge and give it a stir so it's nice and smooth. By this point, the ganache should no longer be warm. (It doesn't have to be perfectly chilled, about room temperature is good.) Pour the ganache all over the cannoli cake.

13. Spread the ganache out into an even layer.

14. Finally, sprinkle on as many of the remaining mini chocolate chips over the cannoli cake as you like. Place the cake in the fridge for at least 3 hours or overnight.
After about 15 minutes in the fridge, add a layer of plastic wrap on top (waiting the 15 minutes gives the ganache time to firm up a little so the plastic wrap won't stick).

Tips and tricks
- Getting even, thin slices of pound cake is important; if they are too thick all of the layers may not fit in the pan. Based on the recommendation of a reader, recently I've been using a ruler (or my favorite bench scraper!) to mark where I need to cut and it helps a lot!

- I also recommend using a sharp serrated bread knife to cut the pound cake, this really helps to get clean slices. The knife I am using is the 9 inch serrated bread knife from Wusthof (affiliate link). I love this knife and highly recommend it!
- When making the ganache, it may seem like the chocolate isn't melting when you first start to stir it, but it will come together so just be patient. If needed, you can microwave it for another 15 seconds and stir again. But, avoid overheating the ganache as this can cause it to split!
Storage instructions
- Any leftover cannoli cake can be kept in the fridge for 2 - 3 days. Just keep in covered and stored in the original square pan.
- The cake layers will become softer and more moist the longer it keeps in the fridge.
- I don't recommend freezing the cake because the creamy texture of the ricotta will be affected.
Recipe FAQs
As I explained in the Ingredient notes section above, I use the 16 ounce (454 g) "Family Size" Sara Lee All Butter Pound Cake. This cake is sold in the freezer section of the grocery store.
If you can't find the "family size" cake, you can also use two regular sized Sara Lee frozen pound cakes, that are 10.75 ounces (304 g) each. You will probably end up using about one and a half of those in total.
Or, you can also buy a pound cake in the bakery section of the grocery store or make your own. You will just need about 12 ounces of cake in total, but it's safer to buy or make a little extra just in case your cake is denser or you cut your slices a bit thicker than I did.
If you don't buy a frozen cake, just stick your cake in the freezer right when you start the recipe. When you are ready to slice the pound cake it will be easier to make thinner, cleaner slices.
This recipe calls for an 8 x 8 inch (20 x 20 cm) square pan. I prefer using a glass pan, because that way you can see if you have any air pockets between the layers.
You also want to use a pan that has deeper sides. If the pan you are using has shallow sides, you may not have enough room to fit all the layers. The pan I recommend is the Anchor Hocking 8-Inch Square Glass Baking Dish with TrueFit Lid (affiliate link). It has sides that are 2.65 inches (6.7 cm) tall.
If you don't have an 8 x 8 inch pan or are concerned that the 8 x 8 inch pan you have isn't deep enough, you can make the cake in a 9 x 9 inch (23 x 23 cm) pan.
If using a 9 x 9 inch pan, keep in mind that depending on the dimensions of the pound cake you are using, you may have a small gap on the sides that you can fill with smaller pieces of cake. The cannoli filling and ganache layers will also be thinner. But, the cake will still taste delicious!
Yes, that's the beauty of this cake! You will need to refrigerate the finished cake for a minimum of 3 hours before cutting into it, but you can make it the day before with no problems. Just make sure to cover the top with plastic wrap (after the ganache has had a little time to set up first).

Related recipes

If you've tried this recipe, please leave a star rating and/or review in the comments section below, I would love to hear from you! You can also follow me on Facebook, Instagram and Pinterest. And sign up for my weekly newsletter to get recipes delivered straight to you!
Print📖 Recipe
Easy Cannoli Cake

A cannoli cake recipe made in a baking pan, so it's easy to take to dinner parties and potlucks! Plus, it couldn't be easier because it uses store-bought pound cake, and only 6 ingredients in total!
- Prep Time: 25 minutes
- Total Time: 3 hours 25 minutes
- Yield: 12 servings 1x
- Category: Dessert
- Method: No Bake
- Cuisine: American
Ingredients
- one 16 ounce (454 g) "family size" store bought frozen pound cake (see note 1)
- one 15 ounce (425 g) container whole milk ricotta cheese
- 12 ounces (340 g) mini chocolate chips, divided (see note 2)
- 1 teaspoon vanilla extract
- 2 cups (473 ml) heavy whipping cream, divided
- ¾ cup (88 g) powdered sugar
Instructions
Note: If your cake isn't frozen, place in the freezer before prepping the following steps.
Make the ganache:
- Place 1 cup (237 ml) of the heavy whipping cream in a medium microwave-safe bowl and heat on high for 90 seconds.
- Add 1 cup (178 g) of the mini chocolate chips, making sure the chips are all submerged.
- Let sit for two minutes and then stir gently until the chocolate is all melted and the mixture is smooth. If the chocolate isn't melting all the way after stirring well, microwave the mixture in 15 second increments until smooth, stirring well in between. (See note 3.) Place in the refrigerator.
Make the cannoli cake filling:
- Place the ricotta cheese, powdered sugar, and vanilla in a medium bowl. Whisk until combined and smooth. Add ½ cup (89 g) of mini chocolate chips and stir to combine.
- Using an immersion blender or hand beaters, beat the remaining 1 cup (237 ml) of heavy whipping cream to stiff peaks. (If you are using an immersion blender, place the cream in a tall-sided container; if using hand beaters, place the cream in a medium bowl.)
- Add half of the whipped cream to the ricotta mixture and gently fold it in. Then fold in the remaining whipped cream. Set cannoli filling aside.
Assemble the cannoli cake:
- Cut the frozen pound cake into ¼ inch (6.35 mm) slices using a serrated knife. Layer some of the cake pieces into a deep 8 x 8 inch (20 x 20 cm) pan so the bottom is completely covered in one layer of cake. (See notes 4 - 5.) Depending on the size and shape of the cake pieces, you may need to trim some of the pieces to fit. It's ok if the pieces overlap slightly. If they do, very gently press them down to remove some of the air pockets.
- Add half of the cannoli filling on top of the bottom cake layer and spread it so the filling is even. Add another layer of cake to the top. Gently press the cake pieces down so the cake adheres to the filling underneath.
- Repeat this process by adding the remaining filling and one more layer of cake on top.
- Retrieve the ganache from the fridge and stir until smooth. Pour all of the ganache over the top and smooth out with a spoon if necessary. Top with as many of the remaining mini chocolate chips as you like.
- Place in the fridge for a minimum of three hours or overnight. Cover the cake after it has been in the fridge for 15 minutes; this allows the ganache to firm up so the cover will be less likely to stick.
Notes
- I used the Sara Lee Family Size All Butter Pound Cake, which you can find in the freezer section of the grocery store. There will be about ¼ of the cake left over. If you can't find the 16 ounce pound cake, you can buy 2 regular size Sara Lee (10.75 ounce) frozen pound cakes; you will have about half of the second one left over. Or, you can buy any pound cake or make your own. I used about 12 ounces of cake in total, but if you are using a different type, buy or make a little extra in case your cake is denser or you cut your slices thicker.
- Make sure to get a full 12 ounces (340 g) of mini chocolate chips. When I originally published this recipe in 2019, most bags of chocolate chips were 12 ounces. Now, due to "shrinkflation," most bags are only 10 ounces! So you will likely need to buy 2 bags and have some leftover for another recipe.
- When making the ganache, it may seem like the chocolate isn't melting when you first start to stir it, but it will come together so just be patient. If you end up needing to microwave it for additional time as instructed in the recipe, be careful to not overheat it so the ganache doesn't split.
- You will need a square 8 x 8 inch (20 x 20 cm) baking pan with taller sides; the one I use has sides that are 2.65 inches (6.7 cm) tall. Or, you can use a 9 x 9 inch (23 x 23 cm) pan instead to ensure you have enough room. If using a 9 x 9 inch pan, the cannoli filling and ganache layers will be thinner. And, to completely fill in the larger size of the 9 x 9 inch pan, you may need to cut some extra pieces of pound cake to fill any gaps.
- Using a ruler will help to make even slices of the correct thickness! If you cut the cake slices thicker than ¼ inch (6.35 mm), you may have trouble fitting all the layers in the pan, depending on the depth of the pan you are using.
- The nutrition information below is an estimate provided by an online nutrition calculator, and should not be considered a substitute for professional medical, health, or nutritional advice. See our full disclosure policy.
Nutrition
- Serving Size: 1/12 recipe
- Calories: 397
- Sugar: 27.9 g
- Sodium: 261 mg
- Fat: 21.2 g
- Saturated Fat: 10.9 g
- Carbohydrates: 44.3 g
- Fiber: .2 g
- Protein: 7.3 g
- Cholesterol: 67 mg


Veena Azmanov says
I love such creative, easy and quick options. Love to gift it to my dear ones. Perfect and yum.
Kate says
Thank you Veena! I'm so glad you like the recipe! 🙂
Jacqueline Debono says
My hubby is Sicilian so he'd love this cake! We're big ricotta eaters and love using it in sweet and savoury recipes! Pinning for later!
Kate says
Yes some of my family is from Sicily too and we love our ricotta! I'm so glad you like the recipe Jacqueline! 🙂
Kathy LaPier says
This cannoli cake was so delicious. Very light and super easy to make. My family loved it. Will definitely make this again!
Kate says
Thank you Kathy for letting me know that you and your family enjoyed the cannoli cake, you made my day! 🙂
Carrie | Clean Eating Kitchen says
What a delicious looking cake - that cream!! Love that this is no bake - perfect for summer!
Kate says
Thank you Carrie! Yes no bake is perfect when it's hot and you don't want to turn on your oven. Or you just don't feel like baking but still want dessert (I feel like that a lot!).
Anna says
What a genius idea for quick, easy and delicious treat! Love that it is no bake, perfect to make during hot summer as I will not have to turn the oven on!
Alisha Rodrigues says
That cake looks so moist and delicious.. I love the texture of it.. Just right !!!
Eva says
Ohhh what a fantastic idea! I would probably miss the crunch of the cannolo but getting a whole cake that tastes like one makes up for that!!
Hope says
You know finishing the cake off with the mini chips and crumbled cannoli shells or pizzelle cookies would be delightful and give that crunch. Or to keep it easy and even though not the same, it would give similar ,and use some crumbled waffle or sugar cones...
Kate says
That sounds wonderful Hope! Adding something crunchy on top would enhance the texture of the cake a lot and would add visual interest. Thank you for the great idea 🙂
Sharon says
I want a giant slice of this cannoli cake as soon as I can get my hands on it! Tons of flavor and easy too, just the type of dessert I love.
Kathryn says
Such a creative way to turn this into an easy dessert! So great for summer parties!!
Veronika's Kitchen says
I love that you are using a pre-made pound cake, which means we don't need to bake anything! It's so hot out this week, so no-bake dessert will be perfect for a weekend gathering!
Neha says
Holy yum! These layers of deliciousness!!! I never knew cannoli cakes are so easy to put together, can't wait to try it out.
Des says
I love how simple this is! Using store-bought cake is simply genius. Really makes this to easy to not make tomorrow night.
Monica says
Holy cannoli this is so good! Sorry I couldn't resist. 🙂 I love the shortcut of using store-bought cake to make this a totally sweet and simple summer dessert. And the flavors of cannoli are always popular!
Summer says
I made this for dessert yesterday and I have to say it was absolutely delicious. I seriously can’t wait for after dinner tonight to have another piece. It was quite easy to put together too. That’s always a plus in my book!
Kate says
That's awesome Summer I am so glad you like the recipe! And yes I completely understand the feeling of being excited to go back for a second piece, my husband and I ate all of this cake between the two of us in a few days I have to admit!
Kathy says
Can you freeze this and for how long
Kate says
Hi Kathy, I'm sorry I didn't respond earlier I somehow missed your comment! I've never tried freezing this cake, so I'm sorry I can't give you a definite answer. My concern would be that the filling would get soggy. If you end up trying it I would love for you to let me know how it worked for you!
Marion says
Nowhere did I see how many servings I can get out of this recipe. I am thinking of making it for an upcoming dinner party I am hosting.
Kate says
Hi Marion, this will make 12 small servings or 9 large servings. If you end up making it I hope you and your family and friends enjoy it!
Joanne says
Can this be made a day ahead?
Kate says
Hi Joanne! Yes you can make it a day ahead for sure! Just cover it with some plastic wrap after the ganache topping has set up in the fridge to keep it from drying out. I wouldn't prepare it more than one day ahead though. I hope you enjoy the recipe if you end up making it!
Karen says
I am making this dessert for a large crowd can I use a 9 by 13 pan ??
Kate says
Hi Karen, yes you sure can, just double the recipe! I hope you enjoy it! 🙂
Barbara M. says
I made this recipe a few days ago and it was delicious! I did add about 1 teaspoon fresh grated orange rind to the ricotta mixture and it punched the flavor up that much more. What I did have an issue with is the family size (16 oz) Sara Lee Pound Cake and 1/4 inch slices. In your directions and photos it shows you only cut 16 1/4 inch slices and showed a small chunk of cake leftover. However, that's incorrect since you need 24 slices. One 16 ounce Sara Lee Pound Cake cut into 1/4 inch slices will yield 24 1/4 inch slices exactly, if you're very careful measuring, and no more! You must be very accurate and careful when slicing the cake to be certain it's no more than 1/4 inch slices or you'll not have enough to complete the top layer. If I may make a suggestion; putting a ruler or a metal tape measure (which is what I used) in front of the cake and using that as a guide, it's easier to make accurate 1/4 inch cuts.
I'm making another one of these cakes to bring to a family dinner party tomorrow. The taste is outstanding and I'm confident it will get rave reviews from everyone! Thanks for such a great recipe!
Kate says
Hi Barbara! I'm so glad you liked the recipe, and the addition of orange zest is a great idea, I'm going to try that next time! Regarding the cake slices, you are exactly right, you need 24 pieces, which I mention in Step 3 of the blog post. However, when I looked back at the picture I used, you are totally right I only show 16 pieces! So I agree that can be confusing, and I'm sorry about that. It's been a while since I made this recipe, so I can't recall if I had some pieces off camera, or if I just cut the remaining chunk there into the last few pieces.
I really like your suggestion of using some sort of ruler as a guide, since at least for myself, I always tend to make everything bigger than a recipe calls for. Thanks for your feedback and helpful suggestion, I'm sure this will help others make the recipe successfully next time!
A quick edit: I just wanted to add that after I posted the original comment above, I tested the pound cake again since it had been so long since I'd made it. The family size 16 oz. Sara Lee cake is about 9 1/2 inches long, so when I sliced it using a ruler, I got 24 1/4 inch pieces with about 3 1/2 inches of cake left. Either way, I think using a ruler is an excellent idea and it really helped me get exact size pieces. I am definitely going to do it that way from now on! Thank you Barbara for the great suggestion! 🙂
Eileen Crowe says
I believe that the original of this recipe was in -- believe it or not -- Glamour Magazine in the late 60s or early 70s. I still have my copy, cut out and laminated. I have made it often for Christmas, and it makes a great gift.
The ingredients called for in the filling with the 9x3" pound cake are: 1 lb ricotta, 2tbs heavy cream, 4tbs fine granulated sugar, 3 tbs orange liqueur, 2 tbs candied orange peel, 1 tbs candied lemon peel (both coarsely chopped) and 2 squares of grated semisweet chocolate. I often have left out the candied peels but added chopped slivered almonds. I also like to use slivered almonds to make holly-type decorations on the sides and top of the icing. They have to be applied quickly while the icing is still warm.
The icing calls for 4 squares semisweet chocolate, 2 tbs whipping cream, and 1 1/3 confectioners sugar, beaten in a double boiler... the directions specify "over, not in, hot water." The editors knew their readers were most likely inexperience in the kichen.
Kate says
Thank you so much Eileen for sharing this! That is so interesting to hear where the original came from. I modified this recipe from a family recipe from my mother, but she couldn't remember where it first came from. I'll have to let her know this origin story, she will get a kick out of it for sure. Thanks again Eileen, I'll have to try this original version sometime as well! 🙂
Maureen says
I was thinking to just cut the loaf in half lengthwise, put it in a loaf pan then add the filling on top place the other half on top, then cover with the ganache. What are your thoughts on this, I just thought it would be easier to slice and serve.
Kate says
Hi Maureen! While I haven't tried it that way myself, I think your idea sounds like it could work, as long as you have a loaf pan with the same dimensions as your pound cake!
The amount of filling you need may be less if you are just going to have 1 layer rather than 2, and the overall dessert would therefore be drier, but that's not necessarily a bad thing because pound cake is delicious 🙂 And you would probably need less ganache too since the dimensions of a loaf pan are smaller than the 8 x 8 pan.
If you try it this way please let me know how it turns out! (I'm also thinking - if you had a super sharp knife and freeze the pound cake well, you may even be able to slice it into three sections horizontally and get the two layers of filling in!)
Heather says
You are amazing!! Thank you so much for all the step by step photos, that is so helpful! I can’t wait to try this!
Kate says
Thank you Heather, I'm so glad you like the recipe, if you end up making it please let me know how you liked it! 🙂
Lydia says
It is an amazing and yummy recipe. Super easy to make. Made it and brought it in for a work meeting, and everyone was raving about it! It was rich yet light. I did only just added 1/2 cup of powdered sugar instead of 3/4, personal preference, but it was perfect!
Kate says
That is wonderful Lydia, I am so delighted that you and your work colleagues enjoyed the cake! And I agree that sweetness level is a matter of personal preference, so I am also happy you were able to tailor the recipe to suit your tastes. Thanks for sharing! 🙂
Carm says
This is delicious !! Took it as a dessert to my pinochle club. My only comment is that you need an 8 x 8 pan that is deep - even with really narrow layers of cake, before I poured the ganache the cake was already at the top of the pan. Had to improvise a collar and some did leak out. Still great taste though and my sister and I are Sicilian and cannoli is my favorite dessert.
Kate says
Hi Carm! I'm so glad that you and your pinochle club enjoyed this dessert! And your note about the deep pan is a really good one, my pan is deep so I don't think I realized that it could be an issue with a shallower pan. Thank you so much for the tip, I'm sure this will help other people when they are making the recipe too. When I make it, I also press the layers down quite a bit, so that also helps everything to fit. My grandma's family is from Sicily, so your compliment really made me so happy thank you so much!
Wendy says
This reminded me of my moms Casatta cake! So to honor her memory, we followed your recipe but added 2 tsp orange extract to the ricotta filling and three packets of instant coffee to the chocolate ganache and it was AMAZING! Thanks for posting this timeless dessert!
Kate says
Wow Wendy those additions sound amazing! Coffee, orange and chocolate are such lovely flavors in combination. I am so happy that you enjoyed the recipe, thank you for sharing!
Brenda A.Mcmillen says
Adding the coffee to the chocolate ganache is so good.. I have always used coffee in mine.. what is the amount of the instance coffee packs you are using.. thank you
Kate says
Ooo Brenda adding coffee to the chocolate ganache sounds like a great idea! I haven't done that before but I'll have to try it. I do use instant coffee in my mocha Oreo no bake dessert, which you can find here! https://nibbleanddine.com/mocha-oreo-no-bake-dessert/
Mary Ann says
Hi
I was wondering if you could make this cake in a springform pan?
Kate says
Hi Mary Ann! Thank you for your question! I've never made this cake in a springform pan before, but I would be a little concerned that the filling would stick to the sides of the pan when you try to unmold it. If you would like to experiment with using a springform pan, I would line the sides with a strip of parchment paper first and make sure the cake is very well chilled before unmolding. Sorry I couldn't give you a more concrete answer, but I hope this helps a little. If you end up using the springform pan, will you let me know how it goes? Good luck Mary Ann!
stephanie giammatteo says
I make this cake without the ganache in a 9 inch square glass pan. the following day I carefully remove the cake from the sides of the pan and invert over and then use whip cream.
Kate says
Stephanie that sounds delicious and I'm sure it has a beautiful presentation with the whipped cream frosting, thanks for sharing!
Karen says
Could I use mascarpone?
Kate says
Hi Karen, sorry for my late reply! I've never tried using mascarpone instead of the ricotta in this recipe, so I can't say for sure how it would turn out. But, it seems like it could be a promising idea, since tiramisu is made with mascarpone and the layering idea with this cake is similar. If you really like mascarpone, I'm wondering if you could use half mascarpone and half ricotta to get the best of both worlds? If you try it please let me know how it goes! 🙂
Lynn says
followed the recipe and it turned out delicious, I am making it again for a second time but this time I’m making my own pound cake I’ll let you know how it turns out.
Thank you for a great recipe 😊
Kate says
Thank you Lynn for your comment, I'm really happy you like the recipe! And please let me know how it turns out with homemade pound cake (I bet it will be amazing!!!).
Christine says
I’m having a big crowd at my home. 8x8, or 9x9 will never feed everyone. Can you give me the measurements of the ingredients for s 9x13 cake pan?
Kate says
Hi Christine! Thank you for your question. I haven't made this in a 9 x 13 inch pan before, but I found this article really helpful: https://food52.com/blog/13239-how-to-make-your-baking-recipe-fit-your-pan-size
It explains that the sizes for 8 x 8 inch multiplied by two, are very close to one 9 x 13 inch pan. So if you double the recipe, it should work with a 9 x 13 inch pan. If you try it please let me know how your guests enjoyed the recipe!
Bea says
I give this recipe a zero! Don't waste your time or money on ingredients! My daughter loves cannoli cake so I thought I would try this recipe for her birthday. I doubled the recipe. Total flop!!! My daughter graciously thanked me and said it's the thought that counts.
Kate says
Bea I am so sorry that you didn't like the cannoli cake recipe! I have to admit, I'm a little confused by your comment because you said it was a flop, but not what happened or why you didn't like it. If you want to provide more feedback on what went wrong, I would be happy to troubleshoot with you. If you just didn't like the taste, then we will have to agree to disagree since taste does depend on the person. Either way, I am sorry that you and your daughter were disappointed in the recipe!
Kim says
Excellent recipe! Wanted something new at the tailgate, this got RAVE reviews. I followed recipe as outlined with one addition; our favorite Italian restaurant has orange zest in their cannolis, so I added zest of one medium orange to the cream. I doubled recipe and used a deep disposable foil pan.
Kate says
Hi Kim, thank you so much for your review and comment! I am really glad that your group enjoyed it and that doubling the recipe worked for you. The orange zest sounds like a wonderful addition!
Janice Christopher says
This recipe didn't work out very well for me. I am an extremely adept cook, and wasn't pleased with the results here.
While I really like the idea of a no bake cake, and using the frozen cake to keep things simple, I found the filling to be lacking in flavor and my ganache never hardened in spite of having refrigerated it.
Kate says
Hi Janice, I am really sorry that the recipe didn't meet your expectations. I really appreciate your fair and honest feedback, and I will take your comments into consideration the next time I update this recipe, because I am always looking for ways to improve. Best wishes, Kate
Kimmie says
Loved this! Very simple to make…next time I make this I’m going to try soaking the pound cake in a rum or an orange syrup before assembling. Delicious!
Kate says
Thank you Kimmie for your feedback, I'm really happy that you enjoyed the cannoli cake. And I think soaking the pound cake in rum or orange syrup sounds absolutely divine!
Ashley says
This is good! I ended up using a little bit bigger of pan because my 8x8 was being used and it turned out fine.
Kate says
Thank you Ashley! I'm glad that using the larger pan worked out well for you and that you enjoyed the recipe 🙂
Joan M says
Could you use cool whip instead of whipping cream and if you could, how much would you need.
Kate says
Hi Joan, that is a great question. I haven't tried to make the recipe with cool whip, but I think you could use it for the ricotta filling and it would be very similar. I think about 2 cups of cool whip would work, because 1 cup heavy cream makes about 2 cups whipped cream. But, I would still use the heavy cream to make the ganache, cool whip wouldn't work for that application. If you try the recipe with cool whip for the filling I would be interested to hear how it turned out!
Teresa says
Amazing recipe! Why have I been baking cannoli cake for so long?!! Haha! My family loves it and I’m going to continue letting them believe it was a long, complicated process! 😊
Kate says
Teresa thank you so much for your comment, this honestly made my whole day. My main goal with this blog is to help people have cooking successes without spending too much energy - almost all of us are tired and working so hard at life already. So I totally agree, no one has to know it was so easy hehe 🙂 🙂
Maureen says
Can this cake be frozen?
Kate says
Hi Maureen, thank you for your question. I haven't tried freezing the cake, but my concern would be that the cake layers could get a little soggy and the texture of the filling would change. However, if you have some leftover cake that you won't be able to get to before it gets bad, I don't see the harm in freezing it in individual squares and defrosting it for later. It just probably won't taste exactly the same as before. I hope this helps!
Nicole says
So this my sound like a dumb question, but in place of the ricotta do know a substitute? My dad and niece are allergic to it and while I know they can choose not to eat it, I was just curious if there can be a substitution?
Kate says
Hi Nicole, I appreciate your question (I firmly believe there are no dumb questions!). In place of the ricotta, my first thought would be mascarpone. But, I'm wondering if your dad and niece are allergic to dairy, or some other component in the ricotta? If dairy is the issue, there are non-dairy ricotta cheeses available, such as from the brand Kite Hill. Maybe that could be an option for you? I haven't tried using nondairy ricotta, but if you end up using it I would love to know how it turned out for you.
Of course, if your dad and niece are allergic to dairy, you would also need to find substitutions for the heavy whipping cream. If that's the case, you can write back and maybe we can find some other ideas in place of the whipping cream as well.
I hope this information helps. If you ever have questions about any of my recipes please feel free to reach out, I would always be happy to give suggestions or brainstorm ideas with you!
Lisa says
I have made this wonderful cake twice now; for each adult child's birthday. They were absolutely blown away, as were all the guests! It's such an elegant, impressive dessert...yet SO easy to assemble! And no-bake is definitely a bonus!
Kate says
Lisa thank you so much for your feedback, I am really delighted that you and your family have enjoyed this cannoli cake recipe so much. I agree it's a great dessert for a celebration! 🙂
Tera says
Can you use mascarpone cheese instead of ricotta cheese?
Kate says
Hi Tera, thank you for your question! I haven't used mascarpone in this recipe before, but yes, I think the mascarpone would be a good substitute for the ricotta. The texture of the filling would likely be a bit denser, richer, and a little less moist. Therefore, the cake itself may not absorb as much moisture from the filling and will also be a bit drier. But I think it would still taste delicious, and if you end up making the recipe with mascarpone please let me know how it turned out 🙂
Karen Bolinger says
I wonder if you can make these in individual cups. Thinking it would be easy for a holiday party! Have you tried that? 🙂
Kate says
Hi Karen thank you for your question! I have not tried making individual cups myself. But, another reader has told me that they made it in individual cups for a party, and she said it turned out well! I think there would be no reason why it would not work, except you would have to figure out how you wanted to cut the cake pieces to get them to fit the cups you are using. Maybe a circle cookie cutter would work well if you want it to be a perfect fit. In that case, I would buy extra pound cake because there would be some trimmings left over. You could also just cut them into squares if you're ok with the cake layer not perfectly fitting inside the cup (you can fill in the gaps with cake scraps if you like). Clear cups would be really nice so you could see the layers 🙂 If you end up making it in individual cups I would love to know how it turns out for you!
Kiley says
I made this last night to take to my family Christmas party, it looks so yummy, but I did have so much filling left over is that normal?
Kate says
Hi Kiley thank you for trying my recipe I'm so happy that it looks delicious! I think if you have filling left over, it could be a couple things - maybe your cake slices were a little bit thicker, or perhaps the pan you were using wasn't as deep as mine, so there was less room to add the filling. Next time you could try using a 9 x 9 pan to give yourself more room for filling. Either way I hope that the cake is a hit at your party. Merry Christmas! 🙂
Maria says
I had this cake at a party about a month ago. Since then I've made it 3x myself, the last one making 6x the single recipe. The first time I made it, the cake part came out like the tres leche cake (which I don't like). The second time, I decided to strain the Ricotta through cheesecloth. Each time I made the recipe, I doubled the ganache and added almond extract in place of the vanilla. The last time, when I had to make 6 of them, I bought bakery fresh pound cake and froze it. I wasn't able to slice it thin so ran out. At the store I grabbed the last Sarah Lee frozen pound cake and an Entenmann's pound cake and froze it. The Sara Lee cake was by far, the best choice. I won't stray from that ingredient next time or again. Thank you so much for such an easy recipe. So many people loved it.
Kate says
Maria thank you so much for your feedback on the cannoli cake recipe, I know this will be helpful for other people reading who are interested in making the cake as well. I'm happy to hear that you and your friends/family enjoyed the cake 🙂