


Halloween windowpane cookies are a fun and creative Halloween treat, perfect for kids' parties or a Halloween potluck. Sugar cookies with Halloween-themed cutouts are filled with hard candy, which melts in the oven to create see-through colorful designs!

Note: this post was originally published in 2019 and updated in 2021 with improved instructions and new photos.
If you need an interesting, festive and fun Halloween treat to serve at your upcoming Halloween party or potluck, I have just the thing for you!
These Halloween windowpane cookies are adorable and really fun to make. You can choose any design or color combo you like, so you can really let your creativity run wild! (And, if you need another fun Halloween treat to add to the party, try my recipe for Halloween witch ice cream sundaes!)
This post contains affiliate links. As an Amazon Associate I earn from qualifying purchases. If you make a purchase through the link, it won't cost you more but I may earn a small commission. I only recommend products that I personally use and love!
Recipe ingredients

Ingredient notes
- Unsalted butter: if you have salted butter, you can use that instead. Just omit the salt from the cookie dough recipe.
- Hard candy: I used Jolly Rancher candies; I find they melt smoothly and one candy is the perfect amount to fill the cutouts. In addition to the original Jolly Rancher combo, I also used Jolly Rancher Fruity Bash (affiliate link) for the yellow, clear, and orange colors! I talk more about alternate candy ideas in the Recipe FAQs section down below.
- Cookie icing: this is optional if you want to add more details to your cookies. I used store-bought cookie icing, but you can also make your own if you like. Just make sure it is the kind of icing that hardens fully so the designs last longer and the cookies are easier to store!
- Black Gel Food Coloring: food coloring is totally optional, or, you can use a different color than black if you prefer. If you want to use black, I recommend Super Black Soft Gel Paste (affiliate link). The cookie dough comes out very black without having to add a ton.
Special equipment
- Round cookie cutter: to make the circle shape, I used the 4 ½ inch diameter circle from this set of round cookie cutters (affiliate link).
- Mini Halloween cookie cutters: You will also need mini Halloween-themed cookie cutters to make the center shapes. The set I used is now discontinued, but just look for shapes that are between 1 ½ inches (3.8 cm) and 3 inches (7.6 cm) in size. This set of 9 mini Halloween cookie cutters would be a good option.
- Metal dough scraper: if your cookie gets a little stuck to the counter, just shimmy this underneath to unstick the cookie without distorting its shape. I love this dough scraper (affiliate link), but if you don't have one, a thin metal spatula would also work!
- Parchment paper and/or silicone baking mats: super helpful when rolling out the dough, and crucial to prevent the melted hard candy from sticking to your baking sheet!
Step by step photos
- First, mix together the flour, salt, and baking powder in a small bowl, then set aside.

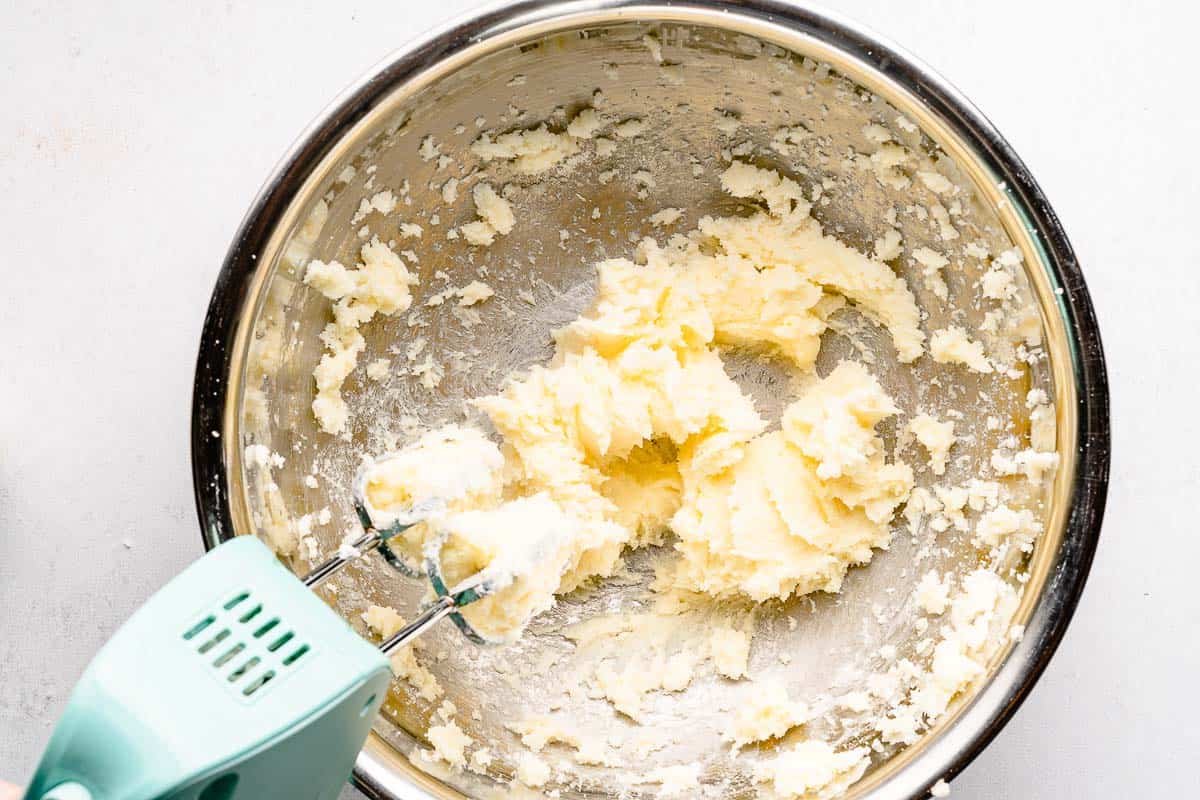
2. Next, cream together the softened butter and granulated sugar. I like using a hand mixer, but if the butter is very soft, you can also do this by hand with a wooden spoon. Just beat or mix together until the butter and sugar are smooth and evenly combined.
3. Now, add the vanilla, egg, and food coloring (if using) to the creamed butter and sugar. Mix together until evenly combined.

4. Now you can sprinkle in the dry ingredients a bit at a time, mixing in between. I used the hand mixer at first, then switched to a spoon when the dough got stiffer.

5. Once the dough is all mixed together, divide it into two even pieces. Wrap each piece tightly in plastic wrap, forming a disk shape. Refrigerate the dough for at least 1 hour, or for up to 3 days.

6. When you are ready to roll out the dough and bake the cookies, first preheat the oven to 350 degrees F.
Then, spread out a large piece of parchment paper and sprinkle it with a generous amount of granulated sugar. Sprinkle some sugar on top as well, then take one of the disks of dough out of the fridge. Roll out the dough to ¼ inch (6.3 mm) thickness. If the dough is sticking, you can add more granulated sugar.

7. Now, use the large round cookie cutter to cut circles in the dough. Place the dough circles on a baking sheet that has been lined with parchment paper or a silicone baking mat. If the dough is sticking, you can scrape it up with a metal scraper or thin metal spatula.
At this point, if you have another baking sheet and silicone liner (or sheet of parchment), you can roll and cut the other dough disk. Or, work in batches, rolling out the second disk once the first tray of cookies is in the oven.

8. Next, use the mini Halloween cookie cutters to make a cutout in the center of each circle. If using a silicone baking sheet, don't press too hard so you don't nick the baking mat.

9. To remove the cutout shape, I like to squeeze the narrow side of the cookie cutter when lifting it up; that action kind of "grabs" the cookie dough inside!

10. If you like, you can use a butter knife to smooth out any rough edges in the cutouts.

11. Place an unwrapped Jolly Rancher in the center of each cutout. Bake the cookies in the preheated oven for 9 - 11 minutes, or until the candies are completely melted and the edges of the cookies are firm.

12. Let the cookies cool on the baking sheet for 10 minutes, or until the candy has hardened. Then, move the cookies to a cooling rack to cool completely.
Once the cookie are cooled, if you like, you can add details to the cookies with cookie icing.

Tips and tricks
- If you are making black cookies, use generous amounts of granulated sugar to roll out the cookies, rather than flour. That way the black color of the cookies will stay true, rather than coming out dusty looking!
- You can re-roll the excess dough scraps right away, or, if the dough is now too soft, wrap it up and stick it in the fridge for 10 minutes or so before rolling again.
- This tip will also work if you are having trouble with the dough at any point in the rolling/cutting process. Cold dough is much firmer and easier to work with, so go ahead and pop the dough in the fridge for a few minutes whenever you need to! For example, you can chill the whole baking sheet if you need help removing the dough from the center cutouts.
- If you are concerned about the food coloring transferring to your work surface, just roll the dough out on parchment paper. And, if you want to protect your rolling pin as well, you can top the dough with another sheet of parchment before rolling out the dough. Just don't forget to dust generously with sugar first, this will really help with any potential sticking!
- I used store-bought white cookie icing to decorate the cookies. To make the black accents, I just added a drop of black food coloring to a small amount of the icing. I mixed them together with a bamboo skewer, then used the skewer to paint on the black icing.
Recipe FAQs
I tested this recipe with Jolly Ranchers, Life Savers, Dum Dums and Charms lollipops. All of those worked except the Life Savers. They didn't seem to melt as well as the others and left me with kind of a lumpy result. And of course, if you're going to use a lollipop, you will need to break the candy up to remove the stick before adding to the cookie!
You can also experiment with other types of hard candy that you like! If you want to be extra cautious, you can bake off one cookie and see how the results are before making the rest of the batch.
You will need between one and two small candies per cookie, depending on the size of your cutout and the size of the candy.
If you don't have a round cookie cutter, you can use a jar lid that's roughly the same size, about 4 - 5 inches. You can even look around your kitchen to find anything circle shaped in the correct size to use as a stencil. For example, you could use the lid of a food storage container. Then, place it on top of the rolled out dough and cut around it with a small knife.
If you don't have the mini Halloween cookie cutters, try cutting out your own shapes with a small knife. A crescent moon shape is relatively simple and would be easy to cut out using a knife. A simple ghost shape and round pumpkin would also be pretty simple to cut out. (Just be careful not to cut through to your silicone baking mat - to be safe you can use parchment instead or carefully transfer the cookies after they have been cut).
Remember - you can always add details to the shapes with the cookie icing, which will help the shapes be more recognizable (for example, adding eyes and a mouth for a ghost, and a jack-o'-lantern face to the pumpkins).
Make sure the icing is fully set before storing the cookies. Once the icing is hard, you can store the cookies at room temperature in an airtight container or plastic bag for up to 3 days. It is very important the container is airtight otherwise the candy centers could get a bit tacky.
To make sure the designs on your beautiful cookies stay pristine, layer the cookies with a square of parchment paper in between each one. This will help prevent black cookie crumbs from sticking on the white icing.

Related recipes

If you've tried this recipe, please leave a star rating and/or review in the comments section below, I would love to hear from you! You can also follow me on Facebook, Instagram and Pinterest. And sign up for my weekly newsletter to get recipes delivered straight to you!
Print📖 Recipe
Halloween Windowpane Cookies

Sugar cookies with fun Halloween cutouts, filled with hard candy to make "windows." A beautiful and spooky Halloween treat!
- Prep Time: 1 hour
- Inactive time: 1 hour
- Cook Time: 10 minutes
- Total Time: 2 hours 10 minutes
- Yield: 14 - 16 cookies 1x
- Category: Dessert
- Method: Bake
- Cuisine: American
Ingredients
- 1 cup (2 sticks, 227 g) unsalted butter, room temperature
- 1 cup (200 g) granulated sugar, plus more for rolling dough
- 1 large egg
- 1 teaspoon vanilla
- 2 ½ cups (320 g) all-purpose flour (spooned and leveled)
- ½ teaspoon salt
- ½ teaspoon baking powder
- ¾ teaspoon black gel food coloring (optional) (see notes 1 - 2)
- 14 - 16 Jolly Ranchers candy (or other hard candy, see note 3)
- Cookie icing (store bought or homemade) (optional)
Special equipment:
- round cookie cutter - approximately 4 ½ inch (11.4 cm) diameter
- mini Halloween cookie cutters - between 1 ½ inches (3.8 cm) and 3 inches (7.6 cm) in size
- parchment paper/silicone baking mat
Instructions
Make the cookie dough:
- In a small bowl, mix together the flour, salt, and baking powder, set aside.
- Add the softened butter and sugar to a separate large bowl or bowl of a stand mixer. Beat the softened butter and sugar together, using a stand mixer or hand mixer, until smooth.
- Add the egg, vanilla, and black food coloring (if using) to the butter and sugar mixture. Mix on medium speed until smooth and evenly incorporated. If using the black food coloring, the mixture should be very black. If not, add a bit more food coloring and mix again.
- With the mixer on low speed, gradually add in the dry ingredients and mix until evenly combined. If needed, switch to mixing the dough with a wooden spoon. Scrape down the bowl occasionally while mixing.
- Split the dough into two equal pieces and wrap each half in plastic wrap, shaping it into a disk. Refrigerate for at least 1 hour or up to 3 days.
Shape and bake the cookies:
- Preheat the oven to 350 degrees F (177 degrees C).
- Remove half of the dough from the fridge. Set a large piece of parchment paper on a work surface. Very generously sprinkle the paper with granulated sugar and place the unwrapped dough on top (see note 2). Sprinkle the top of the dough with sugar and roll out to about ¼ inch thickness. If the dough is too firm to roll out, let sit for 5 minutes and then try again.
- Use a 4.5 inch round cookie cutter to cut the dough into circles. If needed, use a thin metal spatula or metal dough scraper to gently remove the circles from the work surface. Place the large circles onto a baking sheet lined with parchment paper or a silicone baking mat.
- Using a cookie cutter that is small enough to fit inside the larger circle without touching the sides, cut shapes into the center of each circle and remove the dough from inside. (You can bake the center shapes as-is or re-roll them into more circles.) If desired, smooth out any rough edges of the cutouts with a butter knife.
- Place one unwrapped Jolly Rancher into the center of each cutout.
- Repeat steps 2 - 5 with the remaining half of the dough. Bake the cookies for 9 - 11 minutes, or until the candy has fully melted and the edges of the cookies are firm to the touch.
- Leave the cookies on the baking sheet until the candy has solidified, about 10 minutes. Remove to a cooling rack to finish cooling.
Decorate the cookies (optional):
- When the cookies are fully cooled, use the cookie icing to pipe designs onto the cookies.
- Allow the icing to harden fully before storing in an airtight container.
Notes
I used Super Black Soft Gel Paste from AmeriColor (affiliate link), if using a different brand you may need more or less food coloring.
To ensure the black food coloring doesn't stain any surfaces, roll out the dough on a sheet of parchment paper. If concerned about potentially staining your rolling pin, add a piece of parchment paper on top of the dough before rolling (but still add the granulated sugar on top of the dough before adding the parchment paper, this will help prevent sticking!).
When working with the cookie dough, if it becomes too soft and you are having trouble rolling or cutting, place the dough in the fridge for 5 minutes.
If desired, you may substitute other types of hard candy for the Jolly Ranchers (except Life Savers - I have tested these and they do not melt well). If using a new type of hard candy, I recommend experimenting with one cookie only before baking the entire batch to ensure it melts well and you are happy with the results.
Once the icing is fully set, store the cookies at room temperature in an airtight container or plastic bag for up to 3 days. It is very important the container is airtight otherwise the candy centers may become tacky as they absorb moisture from the air.
The nutrition information below is an estimate provided by an online nutrition calculator, and should not be considered a substitute for professional medical, health, or nutritional advice. See our full nutrition disclosure policy.
Nutrition
- Serving Size: 1 cookie
- Calories: 337
- Sugar: 27 g
- Sodium: 180 mg
- Fat: 13.7 g
- Saturated Fat: 8.5 g
- Carbohydrates: 50.9 g
- Fiber: .6 g
- Protein: 2.9 g
- Cholesterol: 48 mg


Leave a Reply