


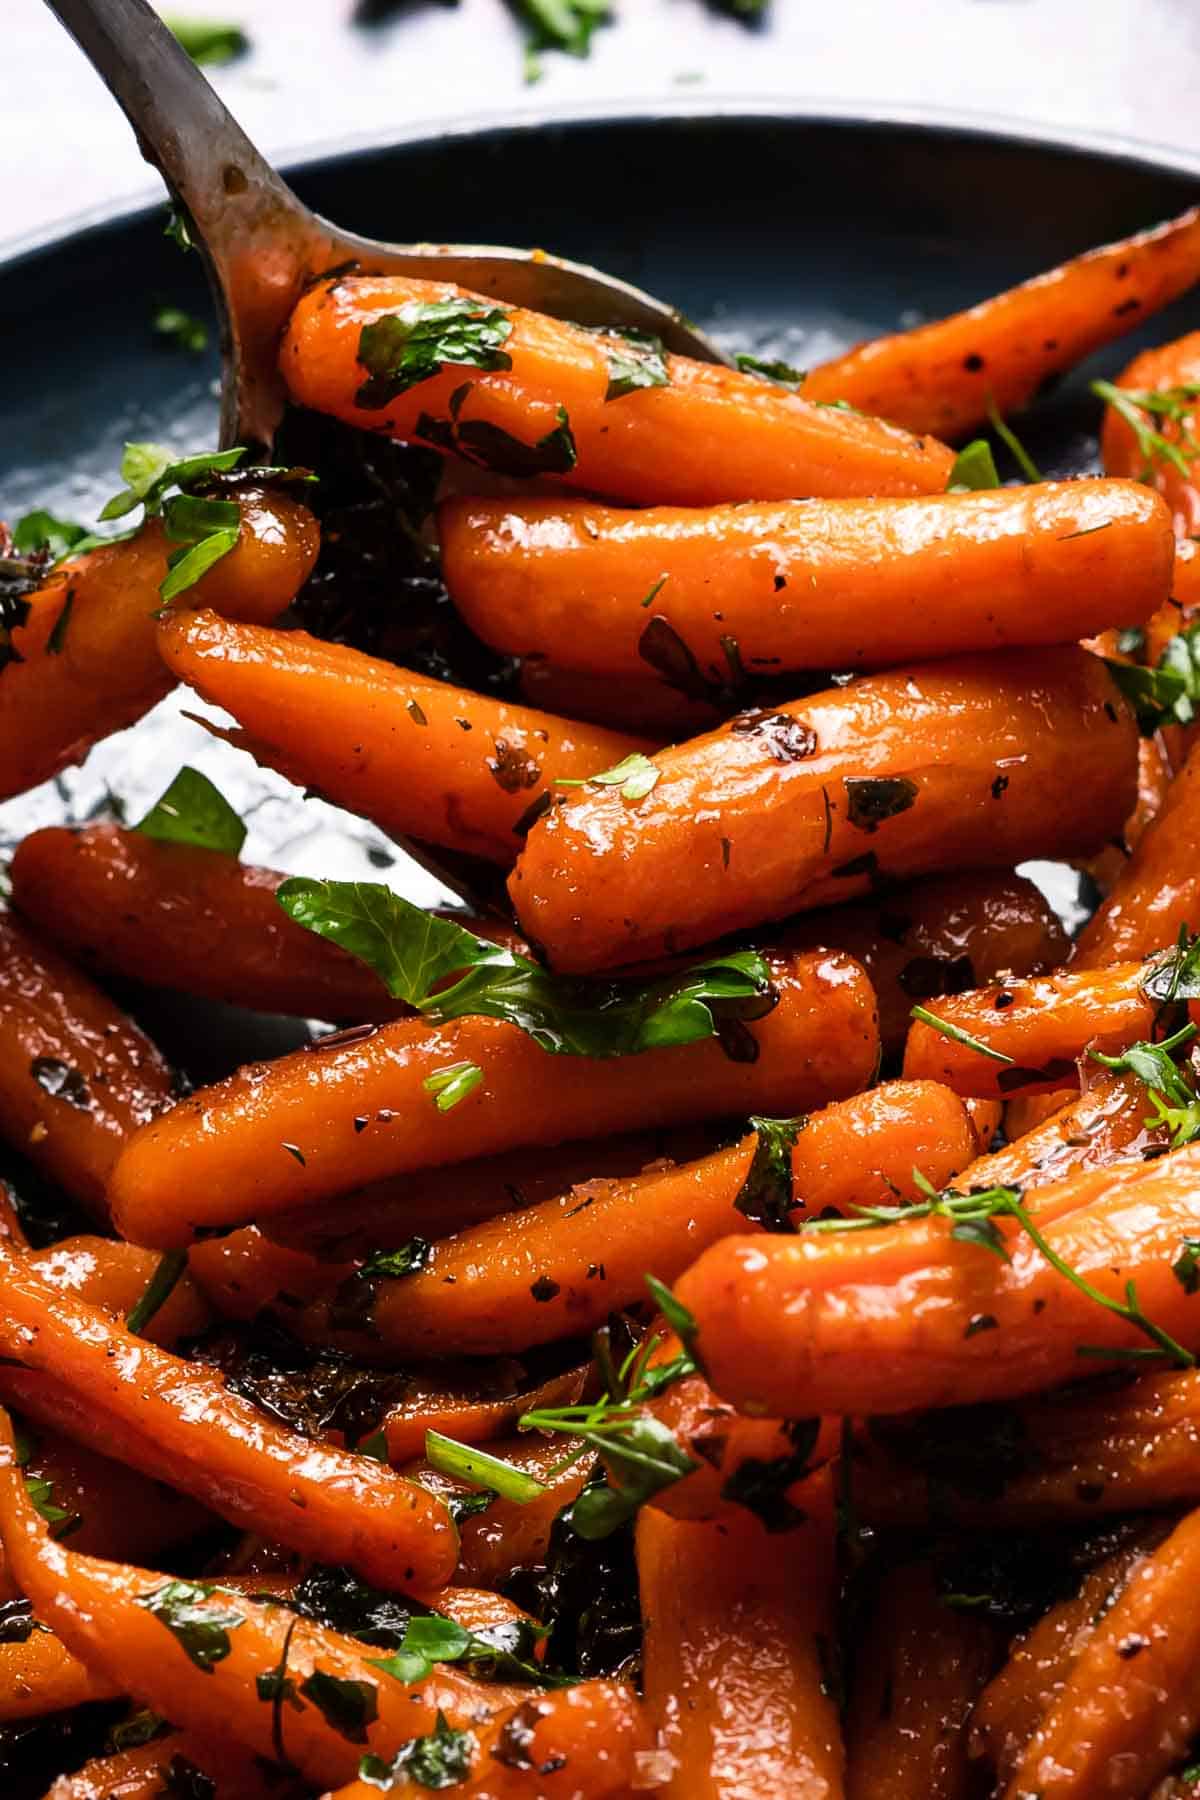
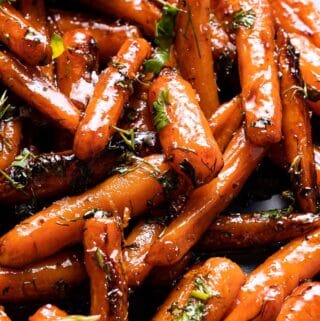
These honey orange glazed carrots can be made in only 20 minutes, thanks to a head-start in the microwave! The glazed carrots are then finished on the stove top, with a simple glaze made from honey, butter and a splash of orange juice.
Note: this post was originally published in 2020 and updated in 2021 with new photos and improved instructions. The recipe was also updated slightly to make the glaze even more tasty!
These honey orange glazed carrots are a super versatile side dish, both beautiful enough for fancy holiday dinners like Thanksgiving, Christmas, or Easter, but fuss-free enough to serve on a busy weeknight!
In fact, you can make this entire dish in only about 20 minutes. The secret is using the microwave to shorten the cooking time (which also frees up your hands to do other prep while the carrots are microwaving!).
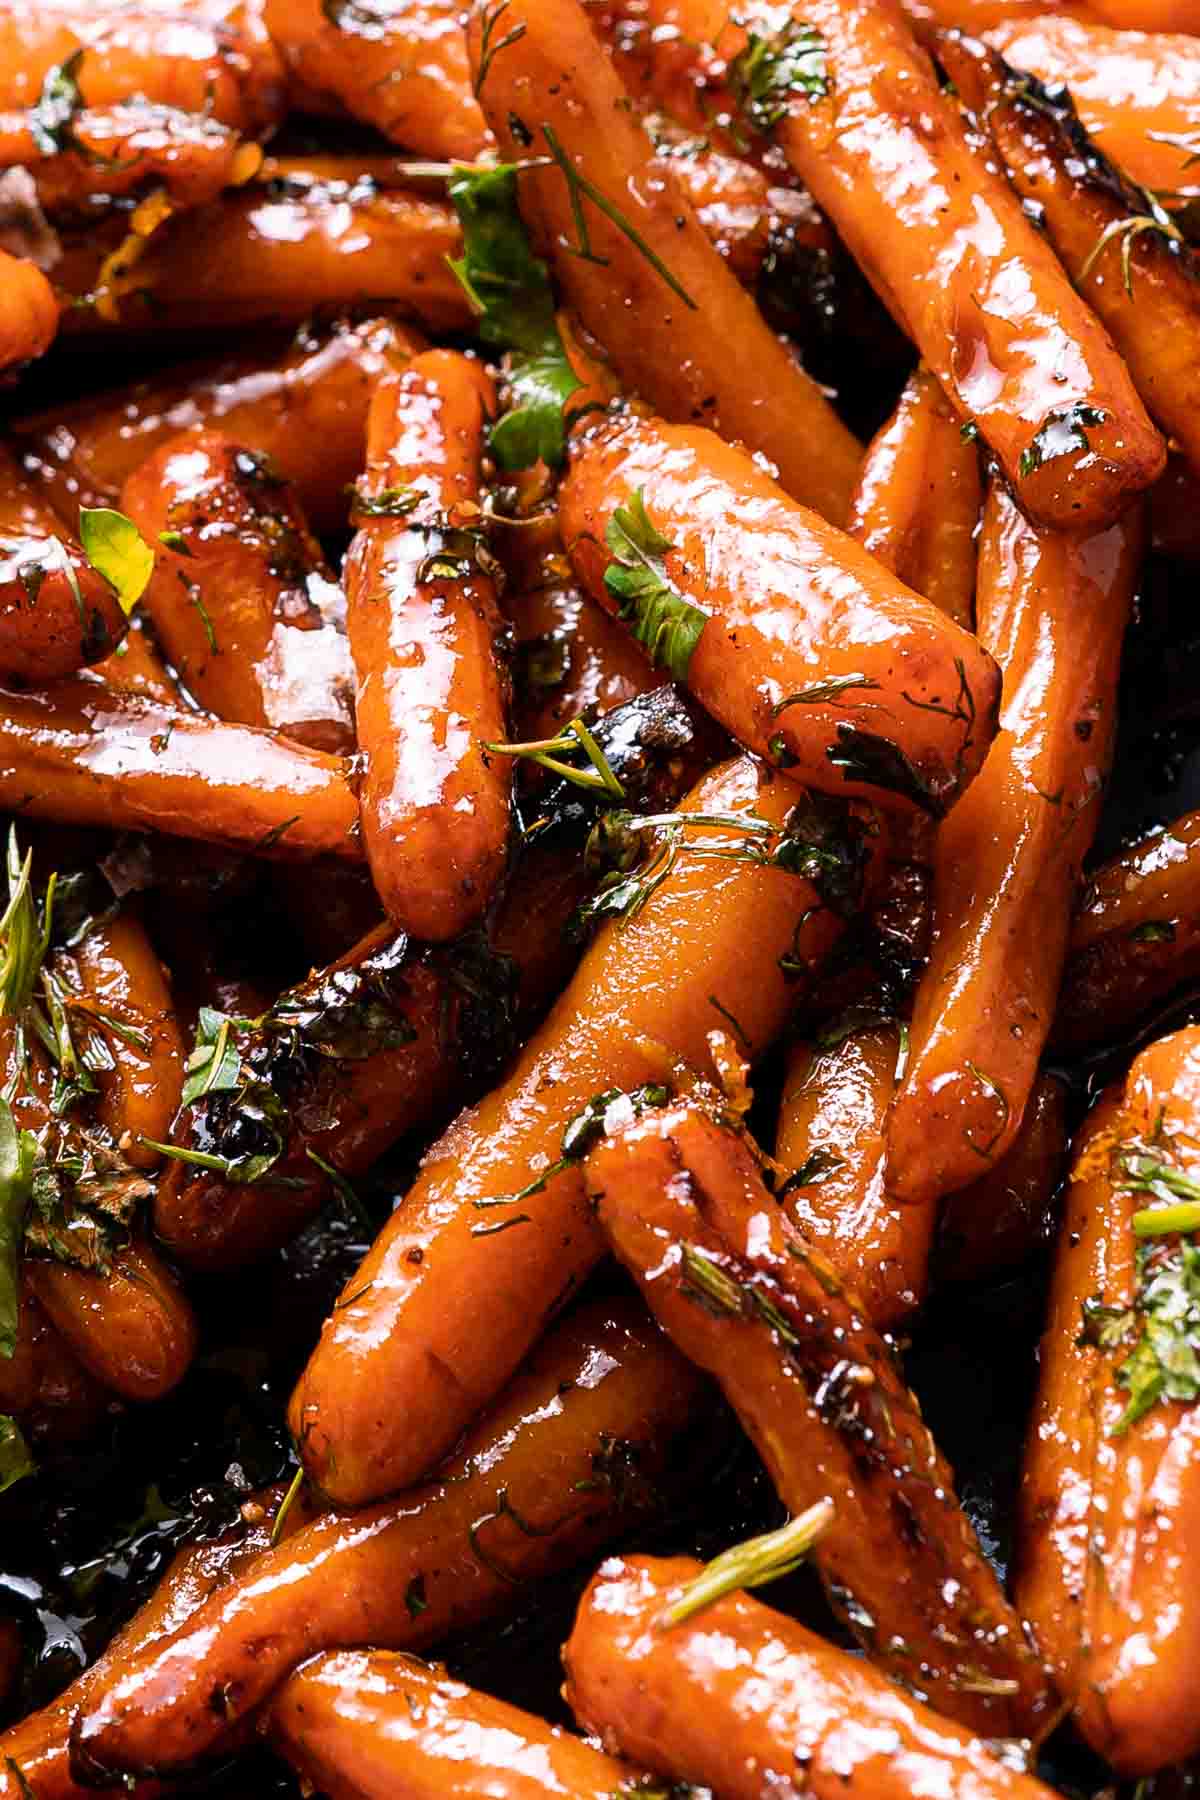
The carrots are then finished in a skillet, where they are glazed with a combination of butter, honey, and orange juice and finished with a pop of orange zest and a sprinkle of fresh herbs. The shiny, glossy glaze is tangy and sweet, the perfect pairing to the earthy and slightly sweet flavor of the carrots.
This post contains affiliate links. As an Amazon Associate I earn from qualifying purchases. If you make a purchase through the link, it won't cost you more but I may earn a small commission. I only recommend products that I personally use and love!
Recipe ingredients

Ingredient notes
- Carrots: I used baby carrots for this easy recipe; for a discussion of why and how to substitute regular carrots, see the Recipe FAQs section below.
- Salt and pepper: I used kosher salt for this recipe but you can use regular salt too. There are no precise measurements on this one, just salt to taste!
- Honey: I like using raw honey; it has a more intense "honey" flavor in my opinion. But you can use any type of honey you like or that you have on hand.
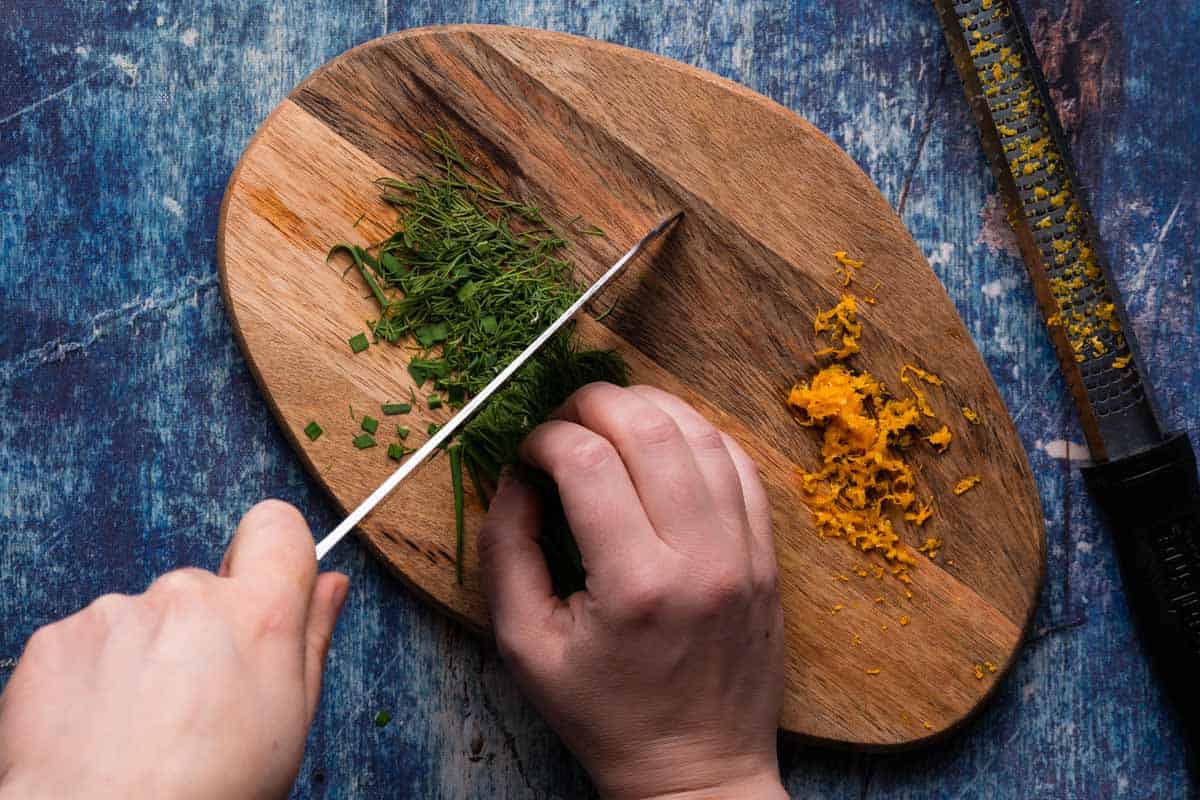
- Fresh herbs: this adds a nice pop of green color and some fresh flavor. Feel free to use your favorite fresh leafy herbs; I recommend parsley, dill, and/or chives.
Step by step photos
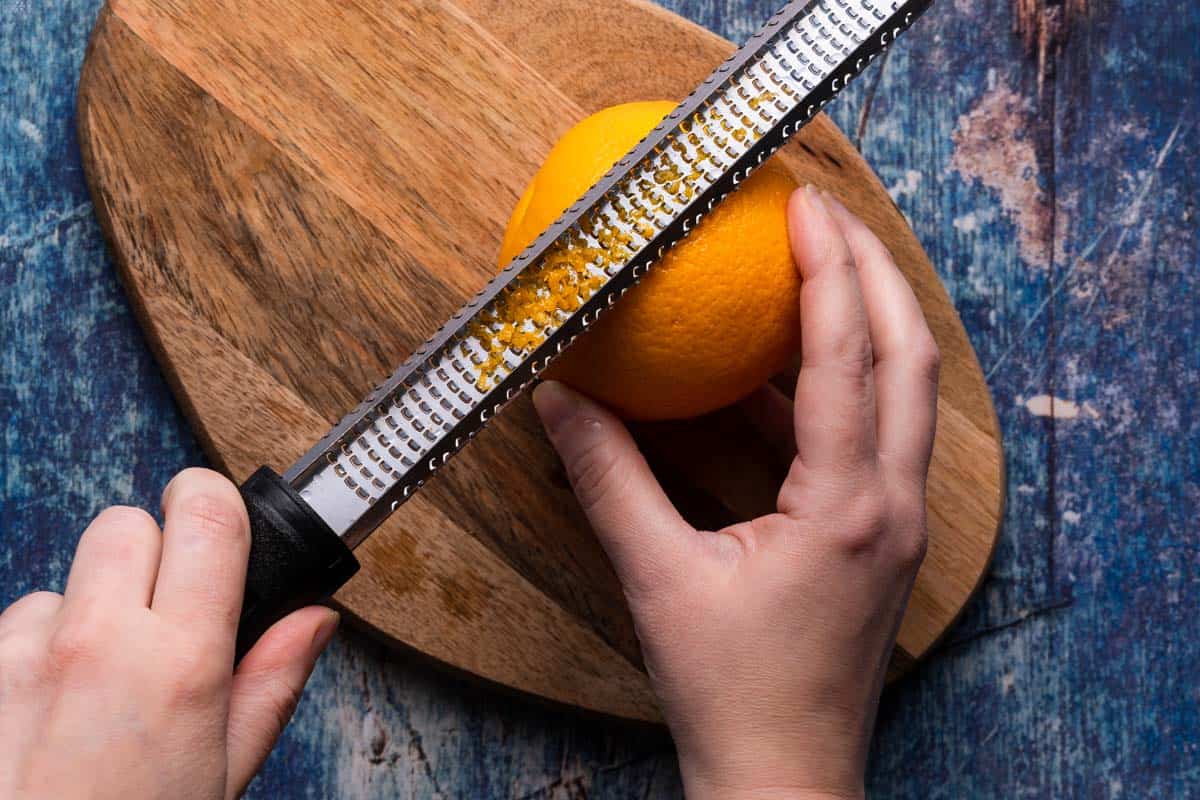
1. The first step is to zest the orange. I like zesting with my Microplane (affiliate link), but if you don't have one, you can use the fine side of a box grater.
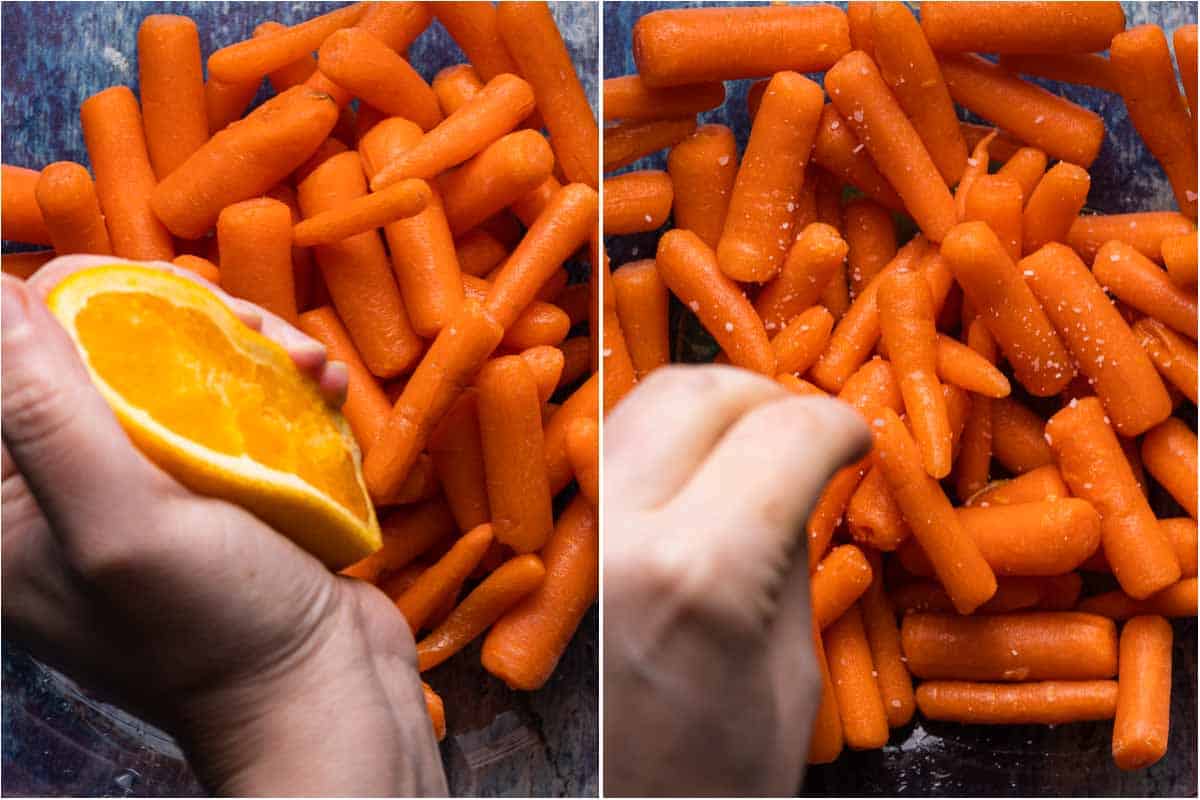
2. Then, place the carrots in a large, microwave-safe bowl. Cut the orange in half and squeeze the juice over the carrots. Sprinkle the carrots with salt.
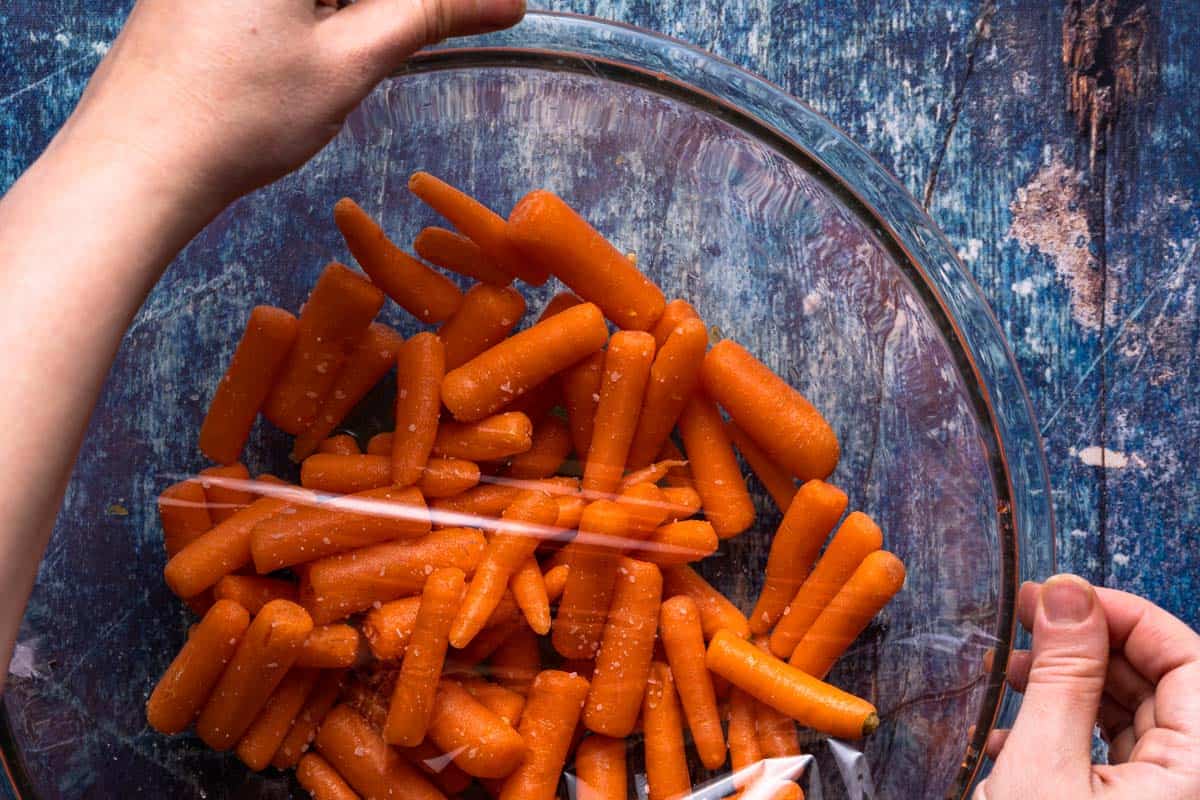
3. Then, either cover the bowl with a vented lid designed for the microwave, or a layer of microwave-safe plastic wrap. If using plastic wrap, be sure to leave a small gap uncovered to serve as a vent, and make sure there is at least 1 inch (2.5 cm) between the top of the carrots and the plastic wrap.
Microwave the carrots for 4 minutes on high; stir the carrots, and microwave for 4 more minutes. When removing the lid to stir the carrots, use caution because hot steam will be trapped underneath!
4. While the carrots are microwaving, you can chop the herbs and prep the other ingredients (measure the honey, grab the 2 tablespoons of butter from the fridge).
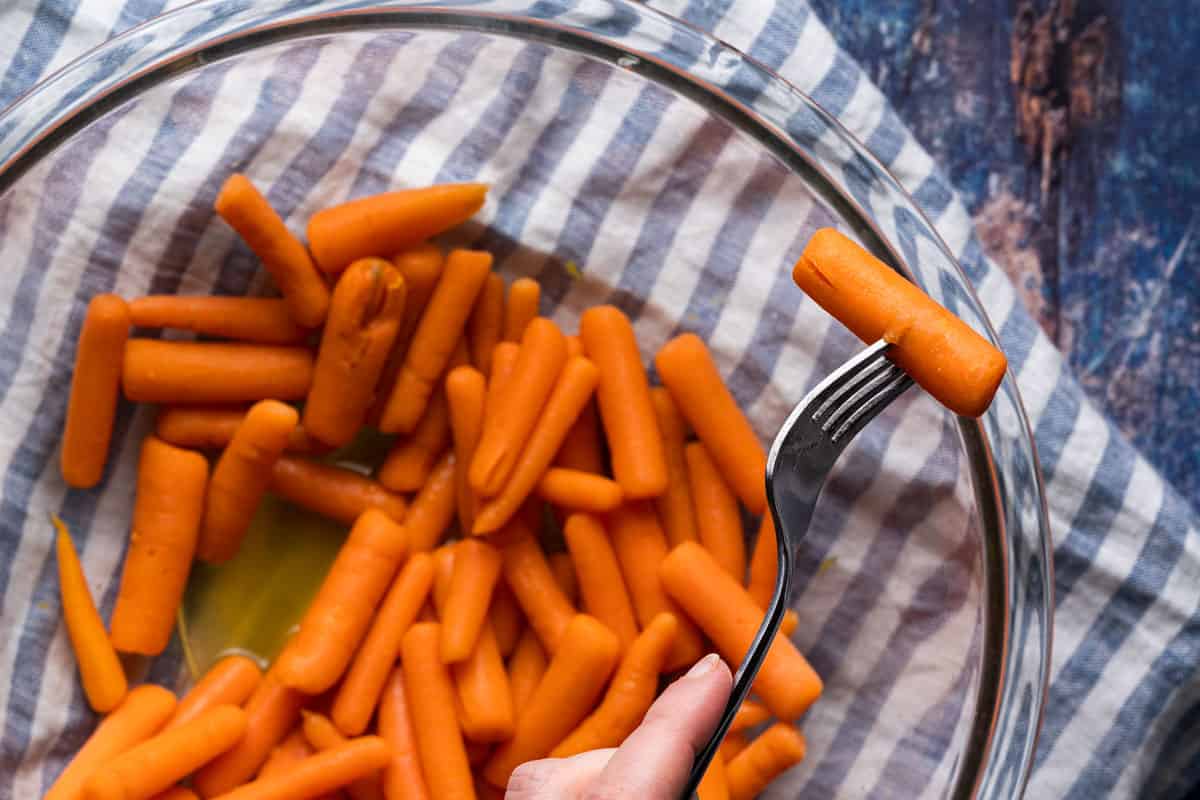
5. After the carrots have been microwaved, check them for doneness. If you can pierce the carrots with a fork with slight resistance, they are done. (Just remember, they should not be completely soft because they will cook further in the skillet.)
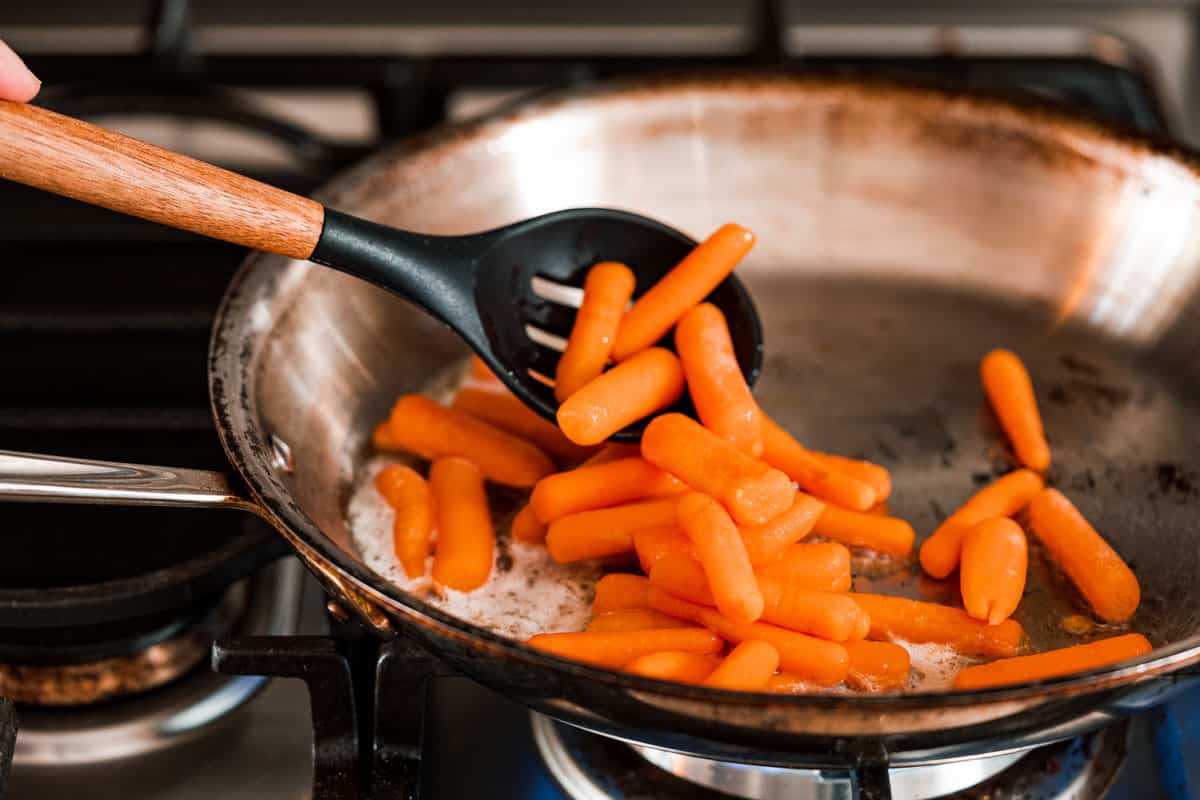
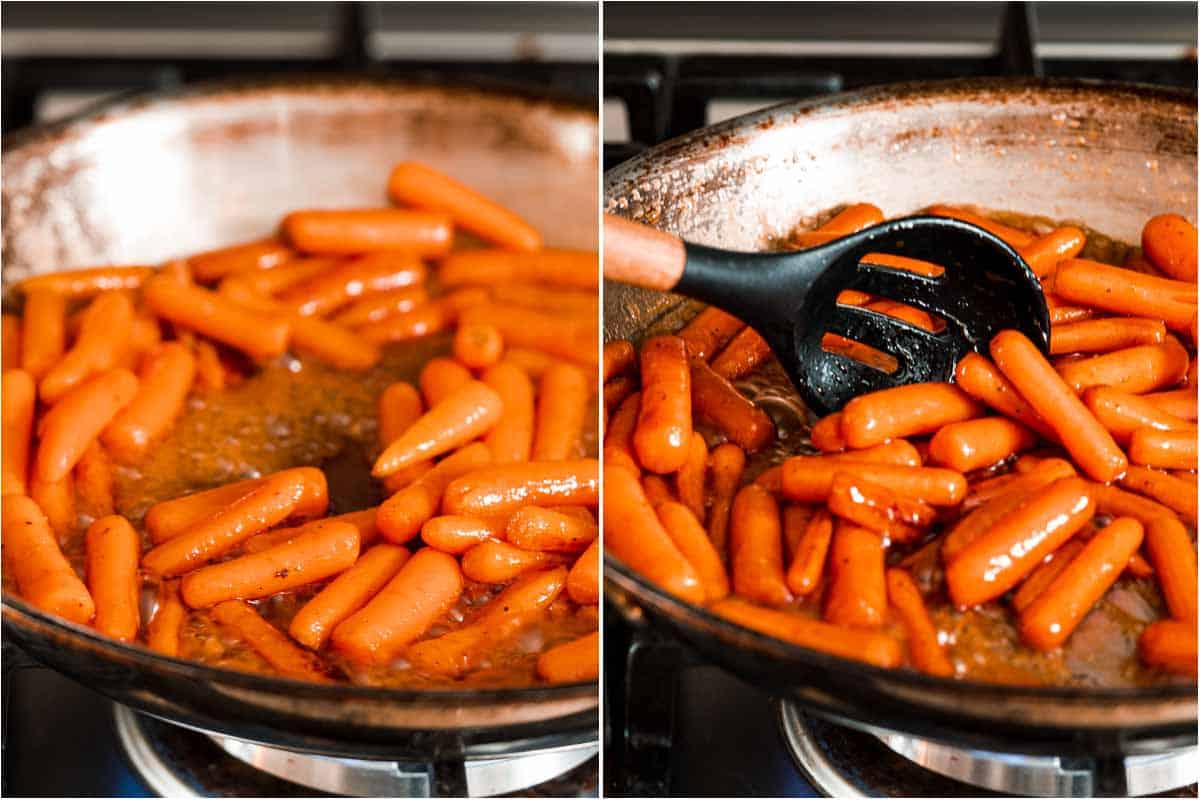
6. In a large skillet set over medium-high heat, add the 2 tablespoons butter. Immediately add in the carrots, using a slotted spoon so the liquid from the bowl drains away. (But reserve the cooking liquid from the bowl!)
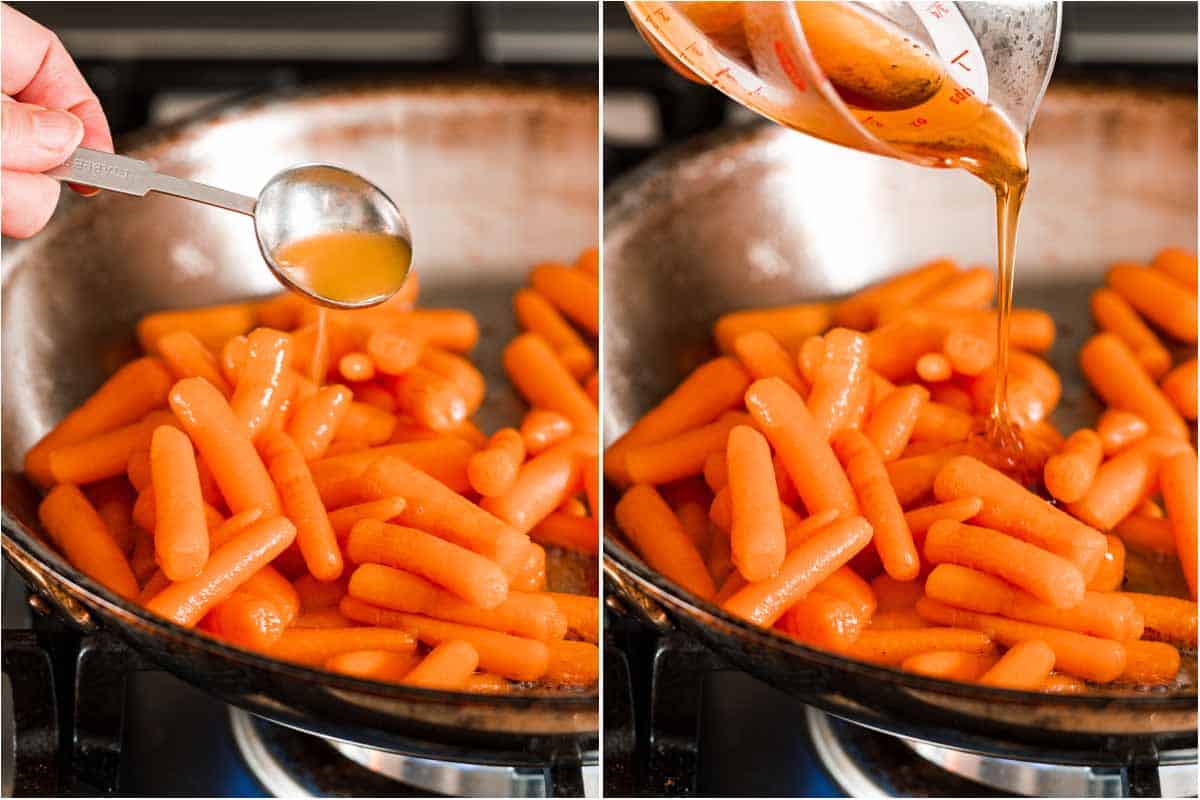
7. To the skillet, add in 1 tablespoon of the cooking liquid from the carrots, along with the honey and a sprinkle of salt and pepper.
8. Let the glaze cook down with the carrots for 5 - 6 minutes, stirring occasionally. After this time, the excess liquid should have evaporated, making the glaze thicken and turn glossy.
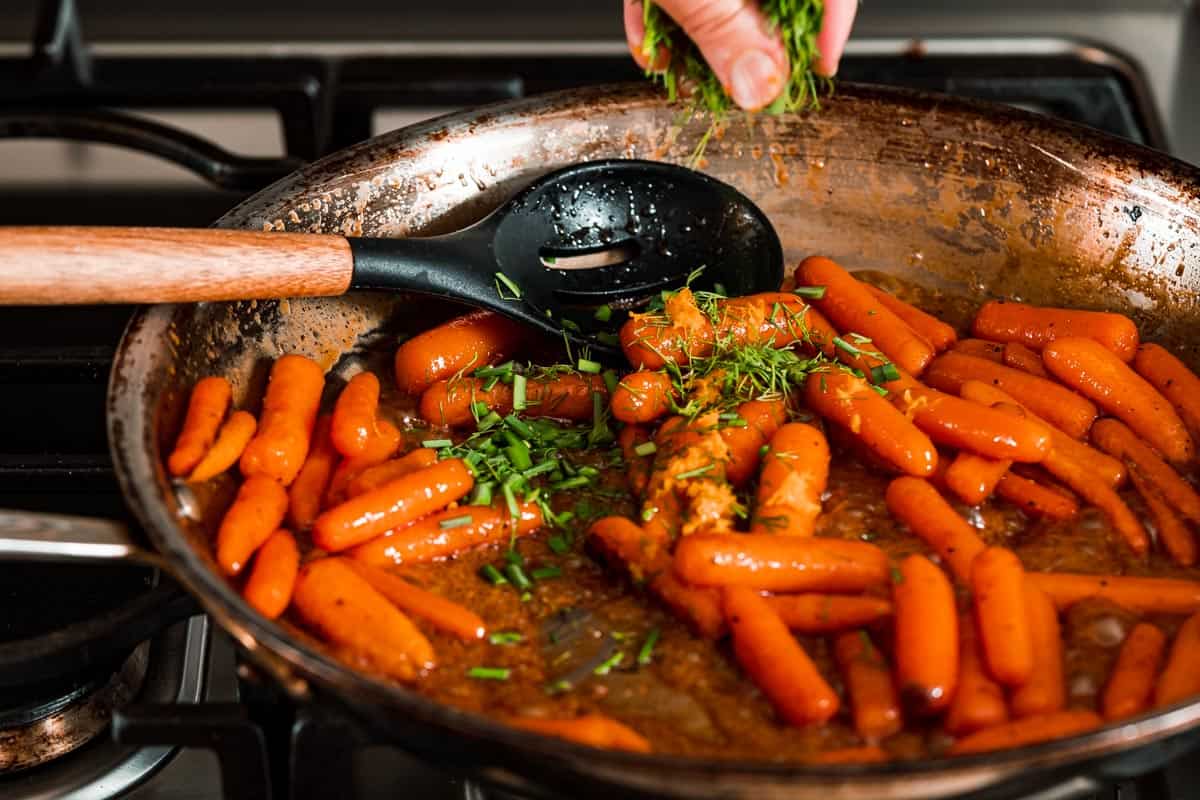
If you like, you can continue to cook the carrots for an additional minute or two, this will darken and caramelize the glaze further, adding even more flavor! Just be careful to stir the carrots more frequently toward the end, and watch carefully to avoid burning them.
9. When you are happy with the glaze, turn the heat off and add the orange zest and fresh herbs. Stir to combine and taste a carrot. Add an additional sprinkle of salt and/or pepper if needed. Serve immediately, garnished with more herbs and coarse sea salt if you like!
Tips and tricks
- If you spray the measuring cup with nonstick spray before adding the honey, it will easily pour out without sticking as much to the container. Or, use my favorite adjustable measuring cup (affiliate link) that easily pushes out sticky ingredients with no mess! (This measuring cup also works wonders on peanut butter, check out my peanut butter rice krispie treats post to see it in action!)
- Make sure you zest the orange before you cut it in half to juice it. It is much easier to zest a whole orange than two, already squeezed halves!
- And when you zest, don't go past the top layer of orange skin, or the whole dish will end up tasting bitter.
- Be careful when you remove the bowl of carrots from the microwave. The bowl itself will be hot so use oven mitts or a thick cloth. Plus, some steam and condensation will have accumulated under the cover. So use caution when you lift up the lid!
Recipe FAQs
I like using baby carrots for this recipe because it saves time on prep, but, you can definitely use regular carrots instead.
To substitute regular carrots, just peel and cut the carrots into your desired shape - thick slices cut on an angle or sticks would be nice options (or, how about trying a fancy roll cut?). Try to cut them into similar-sized pieces so they will cook evenly.
Then follow the rest of the recipe as written, except you will need to adjust the microwave time if your carrot pieces are much larger or smaller than a typical baby carrot (which is roughly about ½ inch (1.3 cm) in diameter and 2 inches (5 cm) long).
If your pieces are smaller, subtract 1 - 2 minutes on the microwave time, and add additional time if needed. Likewise for larger pieces; add 1 - 2 minutes on top of the 8 minutes, and add more if needed.
These glazed carrots taste best when served immediately, so I don't recommend making the carrots ahead of time. Since the entire recipe only takes 20 minutes, hopefully this recipe will still easily fit into your dinner plans!
However, any leftovers can be stored in a covered container in the fridge for 3 - 4 days. Then, you can reheat them in the microwave, or in a skillet set over low heat. If needed, you can add a splash of orange juice to re-moisten the glaze.
These easy glazed carrots would taste great as an accompaniment for classic main courses such as roasted chicken, meatloaf, or pot roast. Because of the orange flavor, it would also pair nicely with my recipe for citrus herb salmon with orange red onion salsa!
Related recipes

If you've tried this recipe, please leave a star rating and/or review in the comments section below, I would love to hear from you! You can also follow me on Facebook, Instagram and Pinterest. And sign up for my weekly newsletter to get recipes delivered straight to you!
Print📖 Recipe
Honey Orange Glazed Carrots
An easy side dish that uses the microwave to start the cooking process! Carrots are then finished in a pan with a simple honey orange glaze.
- Prep Time: 5 minutes
- Cook Time: 15 minutes
- Total Time: 20 minutes
- Yield: 4 servings 1x
- Category: side dish
- Method: microwave, stove top
- Cuisine: American
- Diet: Gluten Free
Ingredients
- 1 pound (454 g) baby carrots (see note 1)
- juice and ½ teaspoon zest from 1 orange
- salt, to taste
- freshly ground black pepper, to taste
- 2 tablespoons unsalted butter
- ¼ cup (59 ml) honey
- ¼ cup (8 g) fresh chopped herbs (suggested herbs: parsley, chives, and/or dill)
- optional garnishes: additional herbs, black pepper, and coarse sea salt
Instructions
- Zest the orange until you have collected enough for ½ teaspoon. Set aside.
- Place the baby carrots in a large microwave-safe bowl. Squeeze the juice from the zested orange over the carrots and sprinkle generously with salt. Stir to combine and then cover the bowl with microwave-safe plastic wrap or a microwave-safe lid with vents. If using plastic wrap, make sure to leave a small space uncovered to act as a vent and that there is at least a 1 inch (2.5 cm) gap between the carrots and the plastic wrap.
- Microwave on high for 4 minutes. Remove the lid and stir the carrots. Replace the lid and microwave for an additional 4 minutes. (Be careful of hot steam when removing the lid from the carrots.) The carrots are done when they are still firm but can be pierced through with a fork with slight resistance. If carrots are still too hard, or if you like softer carrots, microwave in 1 minute increments, stirring in between, until desired doneness is achieved. (See note 2.)
- Add the butter to a large skillet set over medium-high heat. Using a slotted spoon, immediately remove the carrots from the bowl and into the pan with the butter; reserve carrot cooking liquid. (Be careful, butter may spatter when wet carrots are added).
- Add 1 tablespoon of the cooking liquid from the carrots, plus the honey, another sprinkle of salt and a sprinkle of black pepper to the carrots. Cook, stirring occasionally, until most of the liquid has evaporated and the glaze is shiny and thick enough to coat the carrots, about 5 - 6 minutes.
- If desired, continue to cook the carrots for another 1 - 2 minutes, stirring frequently, to further darken and caramelize the glaze. Watch the carrots carefully to avoid burning the glaze, and turn the heat down if necessary.
- Turn the heat off and stir in the ½ teaspoon orange zest and fresh herbs. Taste a carrot and add an additional sprinkle of salt and pepper if needed. Garnish with additional herbs, black pepper, and coarse sea salt (optional).
Notes
You can also use regular carrots instead of baby carrots. Just peel and chop the carrots into thick slices or sticks. If the carrot pieces are much larger than a baby carrot, you will likely need to increase the microwave cooking time.
I found that microwaving the carrots for 8 minutes total as directed resulted in carrots that were cooked through but still firm after finishing them in the pan. If you like soft, tender carrots, microwave them for a minute or two longer. But, just keep in mind they will soften up just a little bit more in the pan after microwaving.
The nutrition information below is an estimate provided by an online nutrition calculator, and should not be considered a substitute for professional medical, health, or nutritional advice. See our full nutrition disclosure policy.
Nutrition
- Serving Size: ¼ recipe
- Calories: 175
- Sugar: 25.9 g
- Sodium: 611 mg
- Fat: 6 g
- Saturated Fat: 3.7 g
- Carbohydrates: 31.9 g
- Fiber: 4.9 g
- Protein: 1.5 g
- Cholesterol: 15 mg


Annie says
I'm so happy I found this! I've been on a real steamed carrots kick these days, but to be honest, they're starting to get a bit boring. This is EXACTLY what I needed to find. I can't wait to spruce things up with this glaze! Thank you!
Kate says
thank you Annie I'm so glad you like the recipe! 🙂
Flaurie S Imberman says
Looks great! Can this be made a day in advance and reheated the next day?
Kate says
Hi Flaurie, yes you can make the carrots a day ahead and reheat them gently on the stovetop. I would save the fresh herbs (if using) until right before you are ready to serve the carrots. If you make the recipe I hope you enjoy it!
Wild Silence says
I'm always looking for new recipes to try including recipes similar to what I have cooked in the past. I love a lot of your recipes. I have a family member that has to watch sugar intake. However honey is better and also maple syrup. I may reduce the amount of those.
My question for this recipe -- What is the wattage of microwave oven used in this recipe? It appears that 4 minutes may be too long for me as I have a 1250 wattage microwave oven which is a delight to use (first time on this higher wattage oven for about two years).
Kate says
Thank you so much for your question! I am so happy that you are enjoying my recipes that means so much to me. The wattage of the microwave I used is 1000. So you're right you may need to check it a little earlier. If you end up making the recipe I hope you enjoy it!