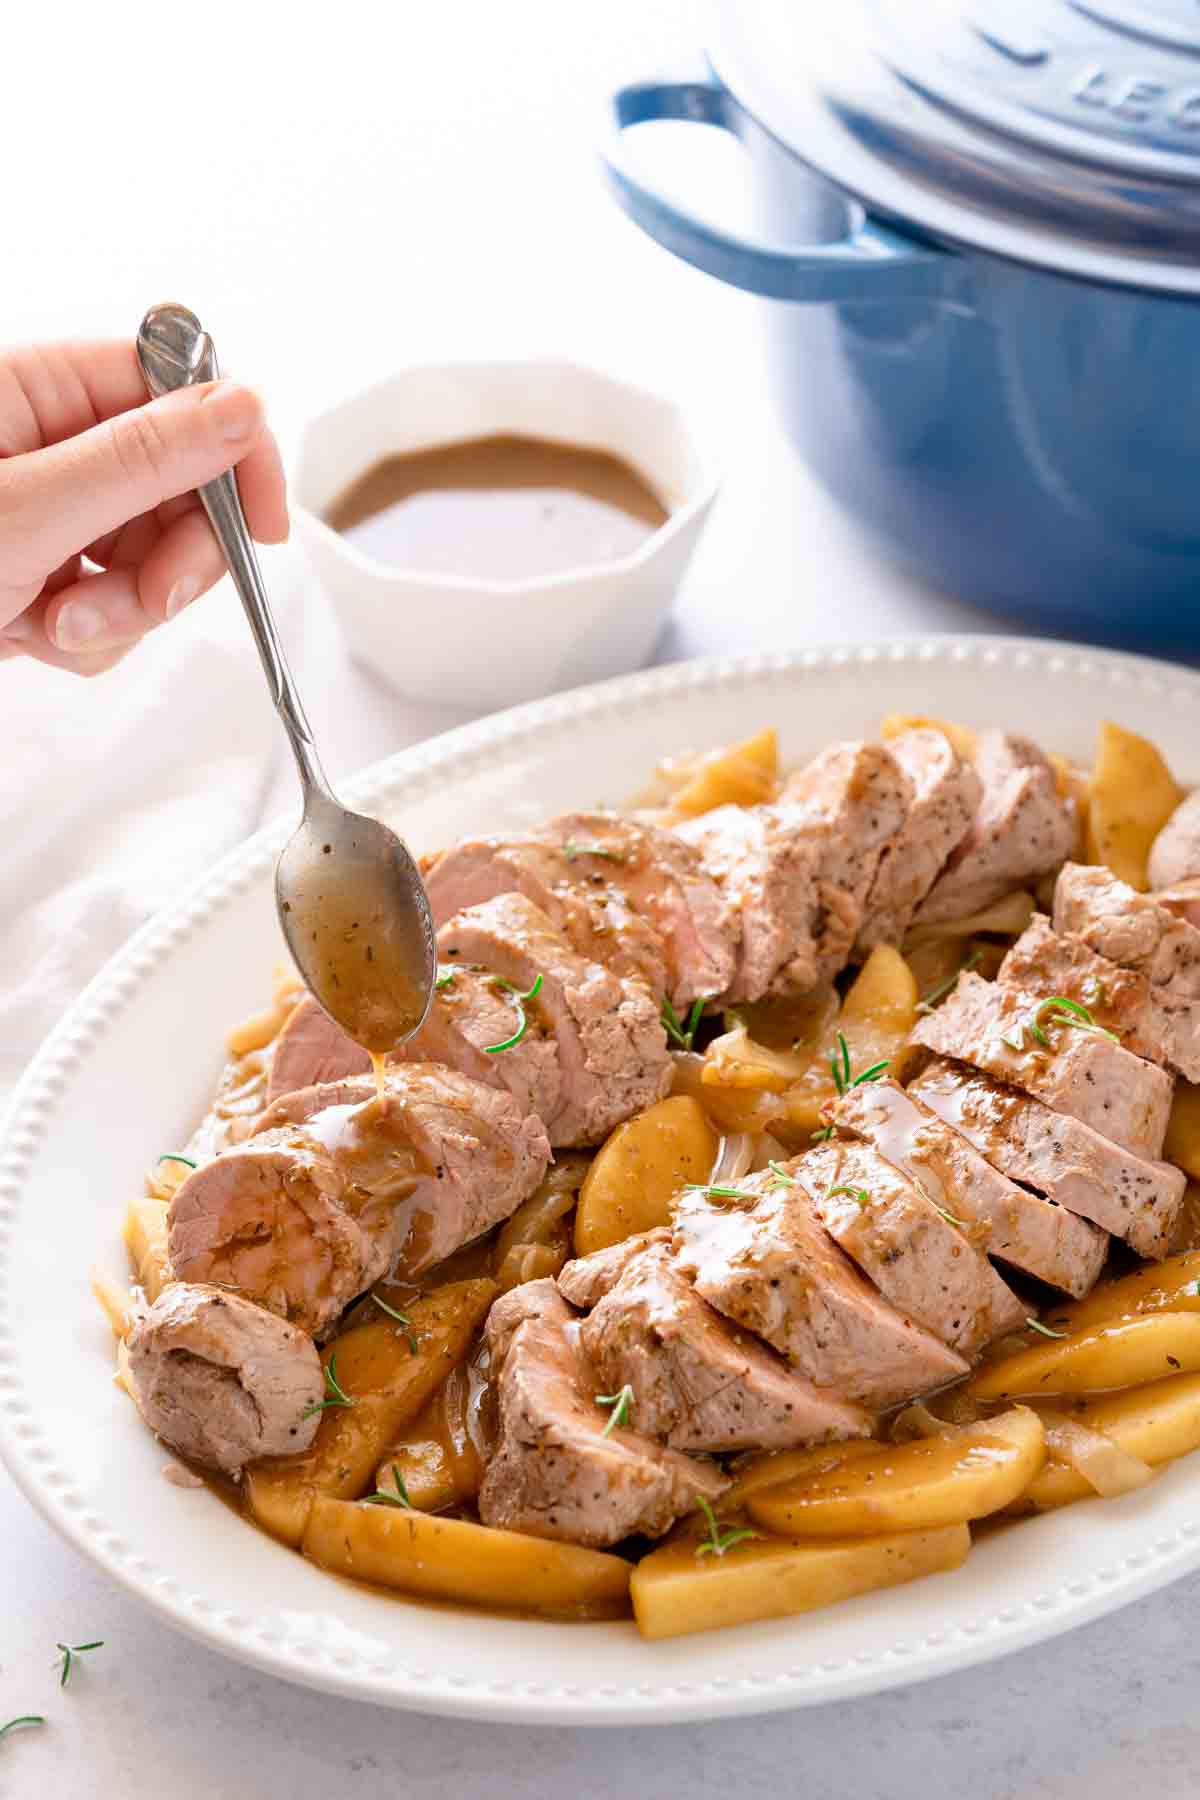
This Dutch oven pork tenderloin is cooked with apples, onions, and an herb-flavored balsamic gravy. This elegant main course would make a marvelous Sunday supper, yet is easy enough to make even on a weeknight! You only need one pot - the Dutch oven - to sear the pork, make the gravy, and finish the dish in the oven.

This easy recipe for Dutch oven pork tenderloin is the best of both worlds! It's comforting, hearty, and really brings that "wow factor" that makes it perfect for Sunday dinner. However, this pork tenderloin recipe can be made with only 9 basic ingredients (not including salt and pepper), and a total time of less than 1 hour.
To make pork tenderloin in a Dutch oven, the seasoned pork tenderloins are first browned in butter, then finished off in the oven with sliced onions and apples. The pork, apples and onions are smothered in a flavorful gravy seasoned with rosemary, thyme, and balsamic vinegar.
This post contains affiliate links. As an Amazon Associate I earn from qualifying purchases. If you make a purchase through the link, it won’t cost you more but I may earn a small commission. I only recommend products that I personally use and love!
Jump to:
Can you cook pork tenderloin in a Dutch oven?
Yes, you can definitely cook pork tenderloin in a Dutch oven! In fact, there are many benefits to cooking your main course, such as pork tenderloin, in a Dutch oven.
One of the biggest benefits is that you can use the Dutch oven to cook both on the stovetop and in the oven, doing double (or triple!) duty without using extra pots and pans. For example, this Dutch oven pork tenderloin recipe uses the Dutch oven to both brown the meat and simmer the gravy on the stovetop. Then, it's moved directly into the oven to finish cooking. All that with only 1 pot!
Using a Dutch oven to cook meat like pork tenderloins is also useful, because the lid helps retain the moisture and flavor while in the oven, and the thick walls of the Dutch oven help the food cook evenly.
Finally, I also like that a Dutch oven looks beautiful enough to use for serving. So, you can start the cooking on the stovetop, finish it in the oven, then move the Dutch oven right to the table for serving. So many dishes saved!
Recipe ingredients

Ingredient notes
- Broth/stock: you can use either chicken or beef broth. I used beef broth, because I like the darker color it gives to the gravy.
- Dried rosemary: I prefer using crushed dried rosemary so it blends into the gravy better, as opposed to whole rosemary leaves.
- Apples: here I used Honeycrisp apples, but feel free to use your favorite cooking apple. Here is a great article on the best apples for cooking.
Special equipment
- Dutch oven: of course, this is the most important thing for cooking pork tenderloin in a Dutch oven! You will need one with a capacity of around 7 - 8 quarts (6.6 - 7.5 liters). If yours is a little larger, that will also work. The Dutch oven I used is the 7.25 quart capacity Dutch oven from Le Creuset (affiliate link).
- Thermometer: while not absolutely required, an instant-read or oven-safe alarm thermometer will help ensure the pork tenderloin is cooked perfectly in the Dutch oven. I prefer the oven-safe alarm thermometer - it has a probe that you insert into the pork before placing it in the oven. The display stays out of the oven and will beep when the target temperature is reached! This is the same type I used for my Dutch oven chicken breast recipe.
Step by step photos
1. Before starting any of the prep, preheat the oven to 400 degrees F (200 degrees C). Then, peel and slice the apples and onions. Make sure not to cut the apples too thin so they don't fall apart. Aim for ⅓ - ½ inch (about 1 cm) thick slices.


2. Set the apples and onions aside. Now we will work on the pork tenderloins. Set the pork tenderloins on the cutting board so we can trim off any silver skin or excess fat. Silver skin is that thin, tough membrane running down the long side of the tenderloin. The silver skin is edible, but very chewy.
The easiest way to trim the silver skin is to use a thin, sharp knife to first cut a little flap into the silver skin near the edge of the pork. Then grab that flap with your non-dominant hand and lift it up as you make shallow cuts parallel to the pork, to trim the rest of the silver skin away.
Next, dab off any excess moisture from the pork with paper towels. Then generously season the pork all around with salt and pepper.


3. Now heat 1 tablespoon of the butter in the Dutch oven over medium high heat. Swirl the butter around to coat the bottom of the pot. When the butter is sizzling, add in the trimmed and seasoned pork tenderloins.


4. Let the pork tenderloins cook in the Dutch oven, without moving them, for about 3 - 4 minutes. Flip the pork and cook for an additional 3 - 4 minutes. Remove the browned pork tenderloins from the Dutch oven and set them aside.
Add in the remaining 2 tablespoons of butter to the Dutch oven.


5. To the melted butter, add the sliced onions. Also add in the dried rosemary, thyme, black pepper, and 1 ½ teaspoons kosher salt. Cook the onions, stirring frequently, for 3 - 4 minutes, or until softened.
Then, sprinkle in the flour. Stir and cook for about 1 minute.


6. Next, pour in the beef (or chicken) broth and balsamic vinegar, plus the sliced apples. With a wooden spoon, scrape up any browned bits stuck to the Dutch oven.
Turn the heat up to high to quickly bring the liquid to a boil. Adjust the heat to maintain a simmer. Simmer the gravy for 4 - 5 minutes, stirring occasionally, until thickened.


7. Now we can add the pork tenderloins back into the Dutch oven, along with any liquid that accumulated around the pork. Make sure to nestle the tenderloins down into the pot.
And, if you have one, now you can insert the probe of your oven-safe alarm thermometer into the thickest part of the pork.


8. Place the lid on the Dutch oven, and put the Dutch oven in the preheated oven. Bake until the pork tenderloins reach 145 degrees F (63 degrees C) at the thickest part. This should take approximately 14- 18 minutes. However, the cook time will vary depending on the size of your pork tenderloins, how much they cooked during the searing stage, and your particular oven.
Remove the cooked pork tenderloins to a clean plate or cutting board to rest for 5 minutes before slicing.


Tips and tricks
- As I mentioned in the Ingredient notes section above, I prefer to use crushed dried rosemary, rather than the whole leaf dried rosemary. The smaller pieces will blend into the gravy better. If you have the whole leaf kind of dried rosemary, you can just crush it up in your hand a little before adding it to the Dutch oven.
- A thermometer takes the guesswork out of knowing when the pork is done. But, check the pork in multiple spots to make sure it's cooked all the way through.
- Be sure to let the pork rest for about 5 minutes before cutting it. This will allow the juices to redistribute back into the meat, rather than running out all over the cutting board. But, take the pork tenderloins out of the Dutch oven to rest, otherwise, the pork may overcook.
- This Dutch oven pork tenderloin recipe was developed using Diamond Crystal kosher salt, which is quite light and flaky. To use regular table salt instead, use only ¾ teaspoon in the gravy, rather than the 1 ½ teaspoons called for. You can always add more to taste at the end of cooking if needed.
Storage and reheating instructions
- Store any leftovers in the fridge in a covered food storage container. You can keep the leftover Dutch oven pork tenderloin in the fridge for 3 - 4 days.
- If you want to keep the leftovers for longer, you can store them in the freezer (again in an airtight container) for 3 - 4 months. The apples will be a little soft after coming out of the freezer, but they will still taste delicious!
- My favorite way to reheat Dutch oven pork tenderloin is to place it into a covered pan (including the apples, onions, and gravy) to warm gently on the stove until heated through (stirring occasionally). If you need more moisture, add a splash of broth or water to the pan. You can even use the same Dutch oven to reheat the leftovers!
- For best results in reheating frozen leftovers, first let them partially thaw in the fridge overnight.
- If you want to use the microwave to reheat a single serving, cut the pork tenderloin into slices or bite-sized pieces first. This will help the pork heat more quickly and evenly than if you try to microwave a larger piece of tenderloin.
Recipe FAQs
For this recipe, make sure to purchase "pork tenderloin" rather than "pork loin." These names sound similar, but are actually different cuts.
Pork tenderloin has a long and thin shape, and usually comes in a package with two tenderloins of 1 pound each (which is exactly what we need, since this recipe calls for 2 pounds of pork tenderloin).
Pork loin, on the other hand, is usually much larger than pork tenderloin, weighing in around 4 - 5 pounds. It also has a wider and thicker shape than pork tenderloin.
The most important factor in keeping the pork tenderloin moist and well...tender, is to not overcook it. Aim for an internal temperature of 145 degrees F. Resting the pork tenderloin for 5 minutes before cutting it will also help the juices to redistribute throughout the meat. That way the juices won't all run out when the meat is cut (resulting in a more juicy bite in your mouth!).
The amount of time your pork tenderloin will take to finish cooking in the Dutch oven after searing will depend on the size of the pork, how cooked it got during the searing process, and how hot your oven is. Even the type of Dutch oven could affect the cooking time.
So, I recommend either using an oven-safe alarm thermometer (that beeps when the target temp is reached), or checking the pork every couple minutes after the minimum cook time listed in the recipe to make sure it doesn't overcook.
This pork tenderloin recipe already comes with its own side of apples and onions, so you don't need to add much to make it a complete meal!
Try pairing the pork tenderloin with a starch such as rice, crusty bread, and/or roasted potatoes (my recipe for air fryer fingerling potatoes would work great). Bonus points for drizzling the gravy overtop the potatoes as well! A green salad would also pair nicely, adding a fresh and crunchy element.
Dutch oven pork tenderloin would also go well with my recipes for roasted brussels sprouts and carrots and lemon herb roasted asparagus.
Related recipes
If you’ve tried this recipe, please leave a star rating and/or review in the comments section below, I would love to hear from you! You can also follow me on Facebook, Instagram and Pinterest. And sign up for my weekly newsletter to get recipes delivered straight to you!
PrintDutch Oven Pork Tenderloin
This hearty and comforting recipe for pork tenderloin uses the Dutch oven to not only save on dishes, but to keep the meat moist and flavorful. The pork tenderloin is cooked with apples and onions, in a rich gravy flavored with herbs and balsamic vinegar.
- Prep Time: 10 minutes
- Rest time: 5 minutes
- Cook Time: 35 minutes
- Total Time: 50 minutes
- Yield: 6 servings 1x
- Category: main course, entree
- Method: stove top, bake
- Cuisine: American
Ingredients
- 2 pounds (907 g) pork tenderloin (2 small tenderloins)
- 2 apples (recommended - Honeycrisp)
- 2 large onions
- 3 tablespoons (43 g) butter, divided
- 3 tablespoons (24 g) all-purpose flour
- 1 ½ teaspoons kosher salt, plus more to season pork (see note 1)
- 1 ½ cups (355 ml) beef or chicken broth
- 1 teaspoon dried crushed rosemary
- 1 teaspoon dried thyme
- ¼ teaspoon black pepper, plus more to season pork
- ¼ cup (59 ml) balsamic vinegar
Instructions
- Preheat the oven to 400 degrees F (200 degrees C).
- Peel and slice the onions. Peel and core the apples, and cut them into thick slices (about ⅓ - ½ inch, or 1 cm, thick). Set aside.
- Trim away the silver skin and any excess fat from the pork tenderloins using a thin, sharp knife. Pat the pork tenderloins dry with clean paper towels. Season the pork with kosher salt and black pepper to taste.
- In a large Dutch oven (7 - 8 quart capacity), heat 1 tablespoon butter over medium-high heat. Swirl the melted butter to coat the bottom of the Dutch oven. Place in the seasoned pork tenderloins. Allow them to cook, undisturbed, for 3 - 4 minutes, or until browned. Flip the pork and cook for another 3 - 4 minutes. (If the butter is getting too dark, turn the heat down.)
- Remove the pork tenderloins to a plate. Melt the remaining 2 tablespoons butter in the Dutch oven. Add the onions, rosemary, thyme, 1 ½ teaspoons kosher salt (or ¾ teaspoon table salt) and ¼ teaspoon black pepper. Cook for 3 - 4 minutes, stirring occasionally, until the onion is softened.
- Sprinkle in the flour and cook for 1 minute, stirring frequently.
- Pour in the broth and balsamic vinegar. Stir to combine, and scrape up any browned bits stuck to the pot with a wooden spoon. Add the apples. Turn the heat up to high to bring the liquid to a boil, then adjust the heat to maintain a simmer. Simmer for 4 - 5 minutes, stirring occasionally, until thickened.
- Turn off the burner and add the pork back into the Dutch oven, along with any juices on the plate. Nestle the tenderloins down into the gravy (they don't need to be fully submerged). Place the lid on the Dutch oven and bake in the preheated oven for 14 - 18 minutes, or until the pork has reached an internal temperature of 145 degrees F at the thickest part.
- Remove the tenderloins from the Dutch oven and allow them to rest for 5 minutes. Taste the gravy and add more salt and/or pepper if needed. The gravy will continue to thicken as it cools.
- For serving, the pork tenderloins can be sliced, then placed back in the Dutch oven on top of the apples and onions.
Notes
This recipe was developed using Diamond Crystal kosher salt which is quite light and flaky; to substitute Morton kosher or regular table salt, use ¾ teaspoon in the gravy rather than the 1 ½ teaspoon called for. When seasoning the pork tenderloins, salt to taste.
The pork can become dry if overcooked, so I recommend using an oven-safe alarm thermometer if you have one. This type of thermometer has a probe that stays in the meat during cooking, and will beep once the target temperature is reached. Or, be sure to check the meat with a regular instant-read thermometer every few minutes after the minimum cook time to ensure the pork does not overcook.
The nutrition information below was calculated using a total of 2 ½ teaspoons Diamond Crystal kosher salt for the entire recipe. This nutrition information is an estimate only; the nutrition counts of your dish will vary based on the brands and exact amounts of ingredients used. This information was provided by an online nutrition calculator, and should not be considered a substitute for professional medical, health, or nutritional advice. See our full nutrition disclosure policy.
Nutrition
- Serving Size: ⅙ recipe
- Calories: 345
- Sugar: 9.9 g
- Sodium: 736 mg
- Fat: 11.3 g
- Saturated Fat: 5.5 g
- Carbohydrates: 18.3 g
- Fiber: 3.2 g
- Protein: 41.3 g
- Cholesterol: 126 mg








Lori Brown
This was delicious! I love the boost of flavor from the balsamic. Will definitely make again!
Kate
Hi Lori thank you for sharing I'm delighted that you enjoyed the recipe. And I love balsamic I agree it adds a nice punch of flavor 🙂