


With a red velvet cake mix and a few other basic ingredients, you can make this beautiful Red Velvet Cheesecake Trifle! This dessert is as easy to make as it is indulgent; after preparing the red velvet cake ahead of time, assembly takes less than 30 minutes. And, you can make either one large trifle to share, or individual trifles!

Note: this post was originally published in 2020 and updated in 2021 with new photos and improved instructions.
You don't need to spend all day in the kitchen to impress your sweetheart with a gorgeous dessert this Valentine's Day. With a prepared boxed cake and only a few other simple ingredients, you will be able to make this indulgent and beautiful dessert.
Moist layers of red velvet cake are nestled together with fluffy and sweet cheesecake filling. This red velvet trifle is so good, you'll want to make it all year round!
Ingredients

Ingredient notes
- Prepared red velvet cake: Any standard boxed red velvet cake mix will do. But, just make sure you also have the ingredients listed on the box to prepare!
- Cream cheese: You will need the kind that comes in a box rather than in the tub for the best consistency.
Step by step photos
(Pre-step: You will need to prepare the boxed red velvet cake and allow it to completely cool before assembling!)
1. Whip the softened cream cheese with either hand beaters or a stand mixer. Make sure there are no lumps; you may need to scrape the bowl down halfway through mixing.

2. Then, add in the sour cream and vanilla.
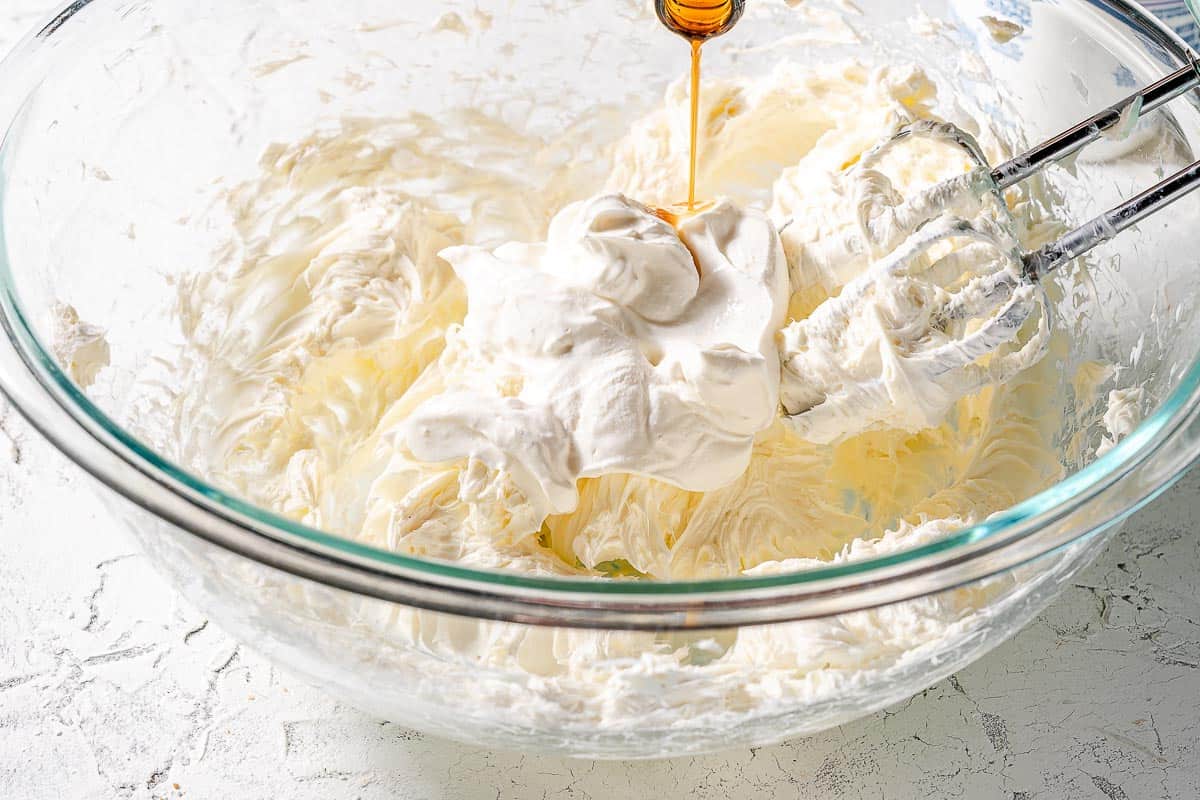
3. Beat in the sour cream and vanilla until smooth.

4. Sprinkle in the powdered sugar in ½ cup increments, beating in between each addition.

5. Continue to beat the cream cheese, sour cream, vanilla and powdered sugar mixture until smooth.

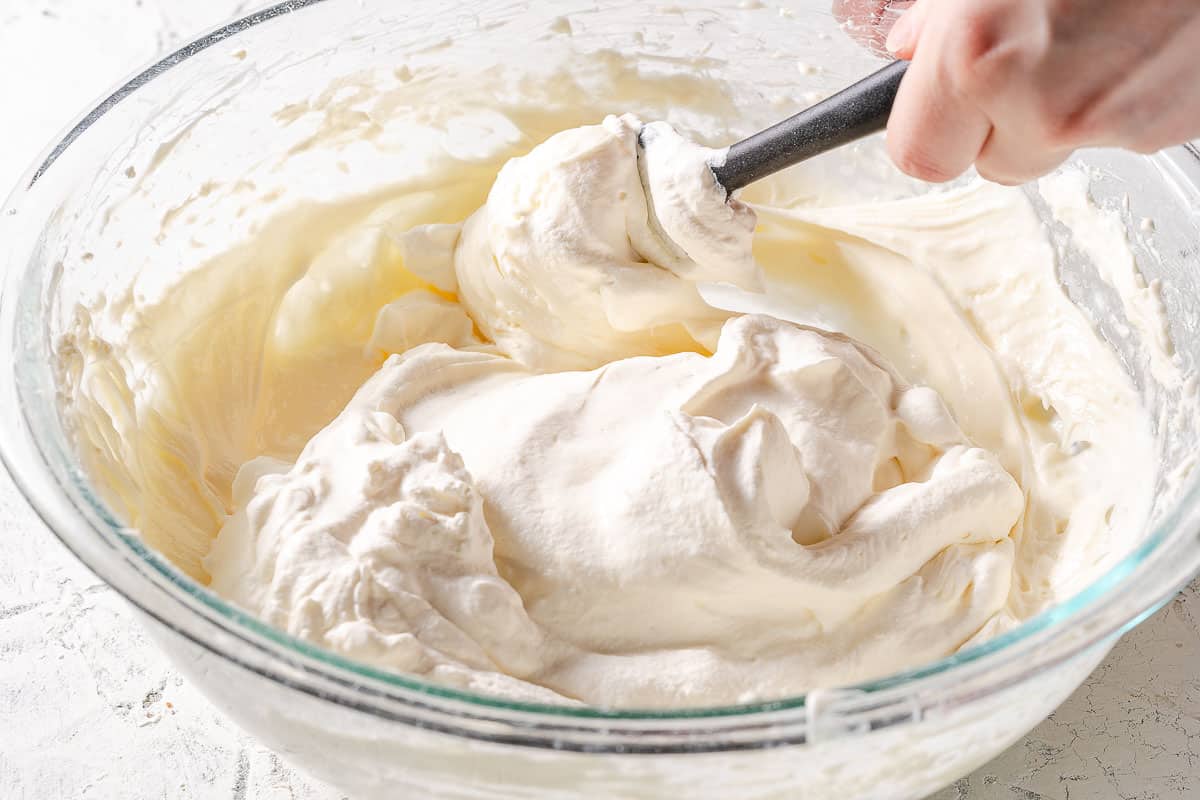
6. In a separate large bowl, whip the heavy cream to stiff peaks.

7. Then, carefully fold the whipped cream into the cream cheese mixture.
8. Cut the prepared red velvet cake into sections, based on how many trifles you want to make. For example, if you want to make one large trifle with three layers, cut the cake into three even sections.
If you want to make nine individual trifles, cut the cake into nine pieces, and then cut each of those nine pieces into three smaller sections. This helps ensure the layers of cake are even throughout the trifle(s)!

9. To assemble the trifle(s), place chunks of red velvet cake into the bottom of the container of your choosing. Then, top with a layer of the cheesecake filling. Continue layering until you have three complete layers of cake and filling.

Tips and tricks
- As I mentioned, before assembly I like to cut the cake into even sections to correspond with how many trifles I want to make. This ensures the amount of cake in each layer is roughly the same. I find it easiest to make even sections when the cake is baked in a 9 x 13 inch pan rather than round pans.
- If you are making individual trifles and want clean layers, I suggest using a piping bag for the filling, rather than a spoon. This will avoid smudges of filling along the sides of the glass! Make sure to choose a large diameter piping tip.
- If you are going to make one large trifle, however, a spoon works just fine since there is more room to maneuver your hand inside the larger opening of a trifle bowl.
- The total volume of this recipe is approximately 14 cups. Your recipe may vary from this estimate depending on the cake you use, how tightly you pack the cake in your trifle bowl, and how fluffy your cheesecake filling turns out. But, this is a good estimate to determine which trifle bowl(s) you want to use. See the next section for more tips on choosing a container!
- If you like, you can customize this recipe by adding in additional ingredients in between the layers. Fresh berries, slivered almonds, or even chopped chocolate would be fabulous! Please note: if you are adding anything extra that is moist (like berries) or that you want to stay crunchy (like nuts), it would be best to assemble the trifles right before serving to preserve the desired texture. (This is opposed to the 3 hour lead time I noted for assembly in the Recipe FAQs section below.)
Recipe FAQs
For this recipe, you can make one large trifle, or individual-sized trifles. The choice is yours! Whether you are making one large trifle or many small ones, make sure to use a clear container (either glass or clear plastic) so you can see the beautiful layers. And it would be even better to have tall, straight sides. This way you will have the height to build thicker layers that will stay more defined.
To make one large trifle, I used a glass trifle bowl that holds 3 quarts, but I had a little bit of cake leftover that wouldn't fit. So you could use one that is 3 quarts or maybe even a bit larger. If you have a much larger trifle bowl, you can always make 1 ½ times the recipe or double the recipe if need be.
As I mentioned in the Tips and tricks section, the total volume of this recipe is approximately 14 cups. Your results may vary a bit of course. But, this is a good guideline to determine how many containers you need, based on the serving size you want for your individual trifles.
For me, a good size for individual servings is 1 ½ cups. This gives you enough ingredients to work with to form defined layers. So, with this recipe you can make about 9 individual trifles.
When it comes to selecting what to actually put the trifles in, you have some options. Wine glasses, ice cream sundae containers, or small drinking glasses would all work!
You can definitely do some of the prep ahead of time for this trifle recipe. Each component has its own timeline, however, so here is a quick rundown:
- You can prepare the cake 2 - 3 days ahead, just keep it tightly covered at room temperature.
- You can make the cheesecake filling up to one day ahead. The cream cheese helps to stabilize the whipped cream, so I found the filling stayed perfectly fresh and fluffy even when I made it one day early. Just keep the filling in its bowl, tightly covered, and store in the fridge.
- You can assemble the trifle(s) up to 3 hours ahead. Keep it in the fridge, loosely covered so the top cheesecake layer doesn't dry out. (You may need to touch up the top cheesecake layer, or, better yet, add the top layer right before serving!).
- If you are adding any garnishes to the top like sprinkles, cake crumbs or candy, do that right before serving to make sure they look as fresh as possible! Especially with sprinkles - some of the color can start to bleed into the topping pretty quickly and not look as nice. So save garnishing for the very end!

Related recipes


If you've tried this recipe for Red Velvet Cheesecake Trifle, please leave a star rating and/or review in the comments section below, I would love to hear from you! You can also follow me on Facebook, Instagram and Pinterest. And sign up for my weekly newsletter to get recipes delivered straight to you!
Print📖 Recipe
Red Velvet Cheesecake Trifle

Red velvet cake chunks are layered with a fluffy cheesecake filling. This is a fun, easy, and indulgent dessert perfect for Valentine's Day, or any time of the year!
- Prep Time: 25 minutes
- Cook Time: 30 minutes
- Total Time: 55 minutes
- Yield: 9 - 12 servings 1x
- Category: dessert
- Method: bake
- Cuisine: American
Ingredients
- 1 red velvet boxed cake mix, plus ingredients to prepare listed on the box
- 16 ounces (2 blocks) cream cheese, softened
- ⅔ cup sour cream
- 1 teaspoon vanilla
- 2 cups powdered sugar
- 3 cups heavy whipping cream
Instructions
Pre-step: prepare red velvet cake in 9 x 13 inch pan, as instructed on the box. (Cake should be fully cooled before assembling trifle.)
- Using electric beaters or stand mixer with paddle attachment, beat softened cream cheese on medium speed until smooth, about 1 minute. Scrape down the bowl half way through if necessary to ensure all the cream cheese is smooth.
- Add sour cream and vanilla to cream cheese, beat again on medium speed until ingredients are fully incorporated and the mixture is smooth, about 30 seconds - 1 minute.
- Add powdered sugar in ½ cup increments, beating on medium speed in between each addition until the powdered sugar is fully incorporated and the mixture is smooth. Set aside.
- If using hand beaters, place the heavy whipping cream in a separate large bowl. If using a stand mixer, scrape out the cream cheese mixture into a separate large bowl, then place the heavy whipping cream into the stand mixer bowl and switch to the whip attachment. (No need to wash the bowl or hand beaters as long as you scrape them off.)
- Beat the heavy whipping cream, starting out on low speed for 1 minute (to avoid splatter), then increasing to high speed until stiff peaks form, about another 3 - 4 minutes.
- With a large wooden spoon or rubber spatula, stir about ⅓ of the whipped cream into the cream cheese mixture. Then, gently fold another ⅓ of the whipped cream into the cream cheese mixture. Repeat with the remaining whipped cream. Try to avoid deflating the whipped cream by over-mixing.
- If making one large trifle, cut the cake into three sections. Gently break apart one third of the cake into chunks and place in the bottom of a trifle bowl. Top with ⅓ of the cream cheese filling. Repeat the process two more times for a total of three layers, ending with the cream cheese layer.
- If making individual trifles, cut the cake into pieces matching the number of trifles you are making. Then divide each piece into three. (For example, if you are making 9 individual trifles, cut the cake into 9 pieces, then divide each of those pieces into 3.) Then follow the instructions for layering in step 7 above.
Notes
- Baking time listed here is only an approximation to give you an idea of how long the recipe will take from start to finish. When baking the cake, please follow the directions written on the box!
- Make ahead instructions: cake can be make up to 2 - 3 days ahead and kept at room temperature, tightly covered. Cheesecake filling can be made 1 day ahead and kept in the fridge, tightly covered. Trifle can be assembled up to 3 hours in advance and kept in the fridge, loosely covered.
- If adding sprinkles or other garnishes to the top of the trifle(s), do so immediately before serving to ensure they look fresh. Likewise, if you choose to add any additional ingredients in between the layers such as fresh fruit, assemble the trifles shortly before serving rather than in advance to ensure the trifle(s) don't become soggy.


Avery says
Turned out delicious!!! 10/10 would make again!
Kate says
That's great Avery I'm so glad that you enjoyed the recipe, thanks for taking the time to share 🙂
Donna says
I made this recipe after I was going to make a Red Velvet Cake for my son’s birthday party. He specifically ask for it. I baked the cake on a storming day and it would Not come out of pan.
Plan B - trifle… I read at least 10 recipes until I came to yours. He loves cheesecake too so I though it would be a win. It as delicious !!! Every bite as eaten.
Thank you for saving me.
I don’t see a way to attach a picture but it was beautiful too.
Lauren says
This was awful - very disappointing!
Kate says
So sorry Lauren you were disappointed in the recipe!
Donna says
I made this recipe after I was going to make a Red Velvet Cake for my son’s birthday party. He specifically ask for it. I baked the cake on a storming day and it would Not come out of pan.
Plan B - trifle… I read at least 10 recipes until I came to yours. He loves cheesecake too so I though it would be a win. It as delicious !!! Every bite as eaten.
Thank you for saving me.
I don’t see a way to attach a picture but it was beautiful too.
Kate says
Donna I am so happy that you were able to save your red velvet cake!! I know that terrible feeling when it won't come out of the pan, or only half comes out! I really appreciate you sharing your success, and I'm so glad that you and your family enjoyed the recipe 🙂
Carolyn says
This recipe was amazing!
Kate says
That's wonderful Carolyn I'm so glad that you enjoyed the recipe! Thanks for sharing 🙂
Vrich says
Absolute Success !!!! Everyone loved it. Will definitely be making it again!!!!
Kate says
Yay Vrich I'm delighted that you enjoyed the recipe thank you for sharing!
Vrich says
Forgot the five stars. Absolute success….Everyone loved it. Definitely will be making it again
Kate says
Aw thank you Vrich I really appreciate that!! 🙂